In one of the the most detailed looks at automotive rendering with Corona Renderer ever made, Robert Bodis from Owlempires shared some general information on his workflow, plus walk-throughs on setting up no less than six different scenes, including video discussions for four of them!
Read more on Robert’s workflow and walk-throughs!
Welcome!
When it comes to CGI, most people will duck and hide to evade helping new individuals who could potentially “take projects away from them.” I want to let everyone know that there are still people who are happy to share their experience and knowledge! I hope every reader will find some information that can take them to a new level.
I’d like to share my great appreciation for all the developers and everybody else who contributed to make Corona one of the world-leader render engines, not to mention the support I got from them the past few months! I am especially grateful to Corona’s Thomas Grimes.
They all made it possible to put food on my table. And now, on to the article!
Introduction
My name is Robert Bodis, 23 years of age, and founder of owlempires.com.
I’ve been in the CG business for about two years now and have been using Corona for a little over a year. I founded Owlmpires in 2015 with Alessia Monacelli – she is on the Architectural Visualization and Design path, while I’m focusing on Automotive projects almost exclusively.
Barely a year has passed since we started our business, but in that time we’ve signed our names to some incredibly big projects for which we are extremely grateful – and the time has come to give something back to the community.
Here’s a little more information in Q&A format:
How did you get into 3D rendering? Do you remembering what your very first render was?
My first render was cooked up in 2013/2014. Back then I was running an extremely old AMD CPU that would overheat after about 2 minutes and reboot my PC. It was a pain. My very first vehicle render was a Nissan Odyvia that I modeled. Looking at it now, it is better than most, but still horrible!
Which came first, the love of cars, or the love of 3D?
I honestly didn’t care about neither of them until like 5 years ago. They came in a parallel and got stuck on me!
How did you discover Corona Renderer?
It was when I had been doing CG for just a few months. I needed a render engine that could keep up with the requirements of the CG world and that would not cost me a fortune to buy. Corona checked itself on both counts, and I’ve been using it since v0.6 for 3ds Max.
What lead to Corona Renderer being your renderer of choice for your projects – what does it let you do that other solutions don’t, or what does it let you do faster and easier?
Honestly, I enjoyed the workflow I was developing and the challenges I could knock down on a daily basis. This combined with being able to make astonishing renders. Sold!
How do you choose the subjects for your scenes, both in terms of the car itself, and the environment you plan on setting it in?
I am only two years in and my resources are quite low, so I often have to go with whatever I have. It’s not like this is an issue, everybody has to go through this at the beginning for various reasons, but I found a simple solution for how to deal with this. Find a vehicle you like then find a backplate you like. Now make them match.
This is not something that will happen once you are a professional and dealing with serious clients, but if it does, you can rise above the challenge easily.
![]()
Studies, Heroes and Friends
I never had any formal training in CGI, nor was I interested in doing this for a living originally. All this knocked on my door couple of years back, and I saw the potential in it and just went with it.
I’ve never seen a reason to learn a subject like this at university, so for me it was either private courses or going the self-taught route. Obviously the private courses were really expensive, so I went with my last option – teaching myself.
That said, there are people who contributed to the person I am and to the skills and experience I have now. I started by watching a friend of mine, Marcus Lundqvist, modeling low polygon vehicles via Skype. This was followed by countless hours of my own trial-and-error modeling!
My base pillar development both in personality and business knowledge comes from a mentor of mine, King Elliott Hulse. I don’t even know how could I repay that man for putting me on my own feet!
These days, I am extremely thankful for the support of my beautiful lady Alessia Monacelli, and my great friend and mentor Jeff Patton, who’s probably one of the top CG Illustrators in the world.
Let’s not forget Derek Rodenbeck and Pierre Norlen who’s been there for me each and every time when I had issues with something, or just needed an honest, more artistic opinion.
I’d highly suggest you all to look up all these people and see what they offer.

CGI 101
Before we jump into 3ds Max itself and make our PCs regret that they ended up under our hands, let’s have a base plan!
Please note that these steps will help you to have your images off to a good start; however, you should use this whole article as a guide for improvement and not a total override of your already flowering style.
Each topic will have a deeper description as you progress with the article.
Buying HDRI/Backplates
- You should only use 4K-5K or higher backplates. These resolutions should be your basic starting points.
- HDRI’s that you shoot or buy should have a high EV range, this will give you nice highlights and sharp shadows.
- The resolution of the HDRI’s is not that important unless you do something with hemispherical projection. I like to keep it in the 15K range for stills, and over 20K for hemispherical animations.
- Most importantly, make sure you have the proper license to use these. You will understand how important it is to be fair and legitimate once you realize that people are making cash/advertising using your renders behind your back!
3D Model quality
- Obviously, the best you can get is a CAD data file from the manufacturer themselves. However, you will only be able to get these if you are very deep in this business, so until you reach that point, I’d suggest to look for models that come in at the 2.5 to 20 million polygon mark. The higher the better!
- The information about Copyright and checking you have the correct licensing also applies here!
Materials
- I’d highly suggest staying away from preset materials. You MUST get comfortable on creating materials from scratch, anytime, anywhere and most importantly, any kind.
- Also a great tip – there is no material on earth that has no imperfections. Study these imperfections closely when striving for ultimate realism.
Textures/Maps
- There are scenarios when you can get away with low resolution textures, but most of the time these stand out and ruin your whole render. Either way, it is not that hard to find high quality textures. Even for free!
- Procedural maps! Learn to love them!
Photoshop skills
- Essential. I love to waste time in 3D trying to make everything perfect, but in the end, a retouch in Photoshop is just essential.
- I like to run Photoshop tutorials, amongst other type of tutorials, in the background. These became my background noise while eating and so on…
Photography
- Investing in and/or learning how to use a DSLR became something very useful for me. CG and Photography go hand in hand! That applies outside of the automotive rendering market, too.
- Follow top photographers closely to understand their way of thinking.
Composition
- Vehicle placement, camera angles, light direction and such. You can get a feel for this from a ton of practice, and from studying reference images to find out what it is that people want in an automotive render (or photograph).
- Make sure your lighting accentuates the main shapes of your vehicle. This doesn’t have to apply to every scenario, it will vary from render to render depending on the type of shot you are going for.
- Overall look – when looking at your final render, your eyes should instantly focus and hold on your vehicle. It is important to find a balance between your vehicle and backplate; the vehicle should be the main focus in the image, but you don’t want it to overly “pop out.” as this would make it look all weird and fake.
- In the case of adding some sort of a motion blur, avoid your vehicle being blurry. Think like a photographer again – when they photograph a moving vehicle, they track it with the camera so that the car remains razor-sharp and motion blur only happens to the road and background.

Building up a scene
This is the path that I follow. I found that it saves me time, and reduces the chance of error as I work.
– I always start by analyzing what I have, like what models and images I have on hand, what the copyrights are for these, etc. Copyright violation is way too common, don’t be part of the problem. Remember, you wouldn’t want someone stealing your work and leaving you without an income!
– Start with the vehicle. This will be the your subject, and most of the time will be the most important piece in your composition. Make sure it is a high quality model. I always prefer CAD models if possible, in other cases I like to use Squir models.
– With the vehicle selected, it is time to choose the backplate. There are many different types of environments you can chose, and some will match a certain vehicle better than the others.
For example: A luxury car might go well with a urban environment, while sports cars go well with clean public roads up in the mountains with lots of turns and a long visible range of tarmac. For offroad cars, anything dirty and muddy, make them jump and climb rocks! Think of what people use the vehicle for, and go along that path!

Don’t be afraid to compose different environments together. By composing and combining different environments, you will create a unique scene that no one has ever used, even starting with stock footage.
I’d also highly suggest to add motion blur to the backplate prior to importing into 3ds Max. Then later you will be able to match the vehicle’s wheel motion blur, without having to worry about blurred-out shadows in post-processing.
I’ve often seen people use moodboards and similar, but I usually make things up on the go, so moodboards are not so beneficial for me – they might be for you, though, so find what fits your workflow!
– Once I have my backplate, it is time to set up some approximate lighting. This will not only help when creating or adjusting your materials on the vehicle, but will also give a general idea of what things will look like.
Remember, if your backplate does not match your HDRI, you can always make changes to them. You can rotate them as you wish, clone stamp out their sun and replace it with a CoronaSun in your 3D scene, mix two together, and so on. Just make sure that they will still have a great dynamic range and that you have your light/dark directions properly set
– Once your lighting is set, you can now adjust your vehicle materials. If your materials are made correctly, this only take a few minutes. I often found that even the most perfect material needs minimal adjustments when lighting changes.
So with those general principles laid out, let’s take a look at some specific examples!
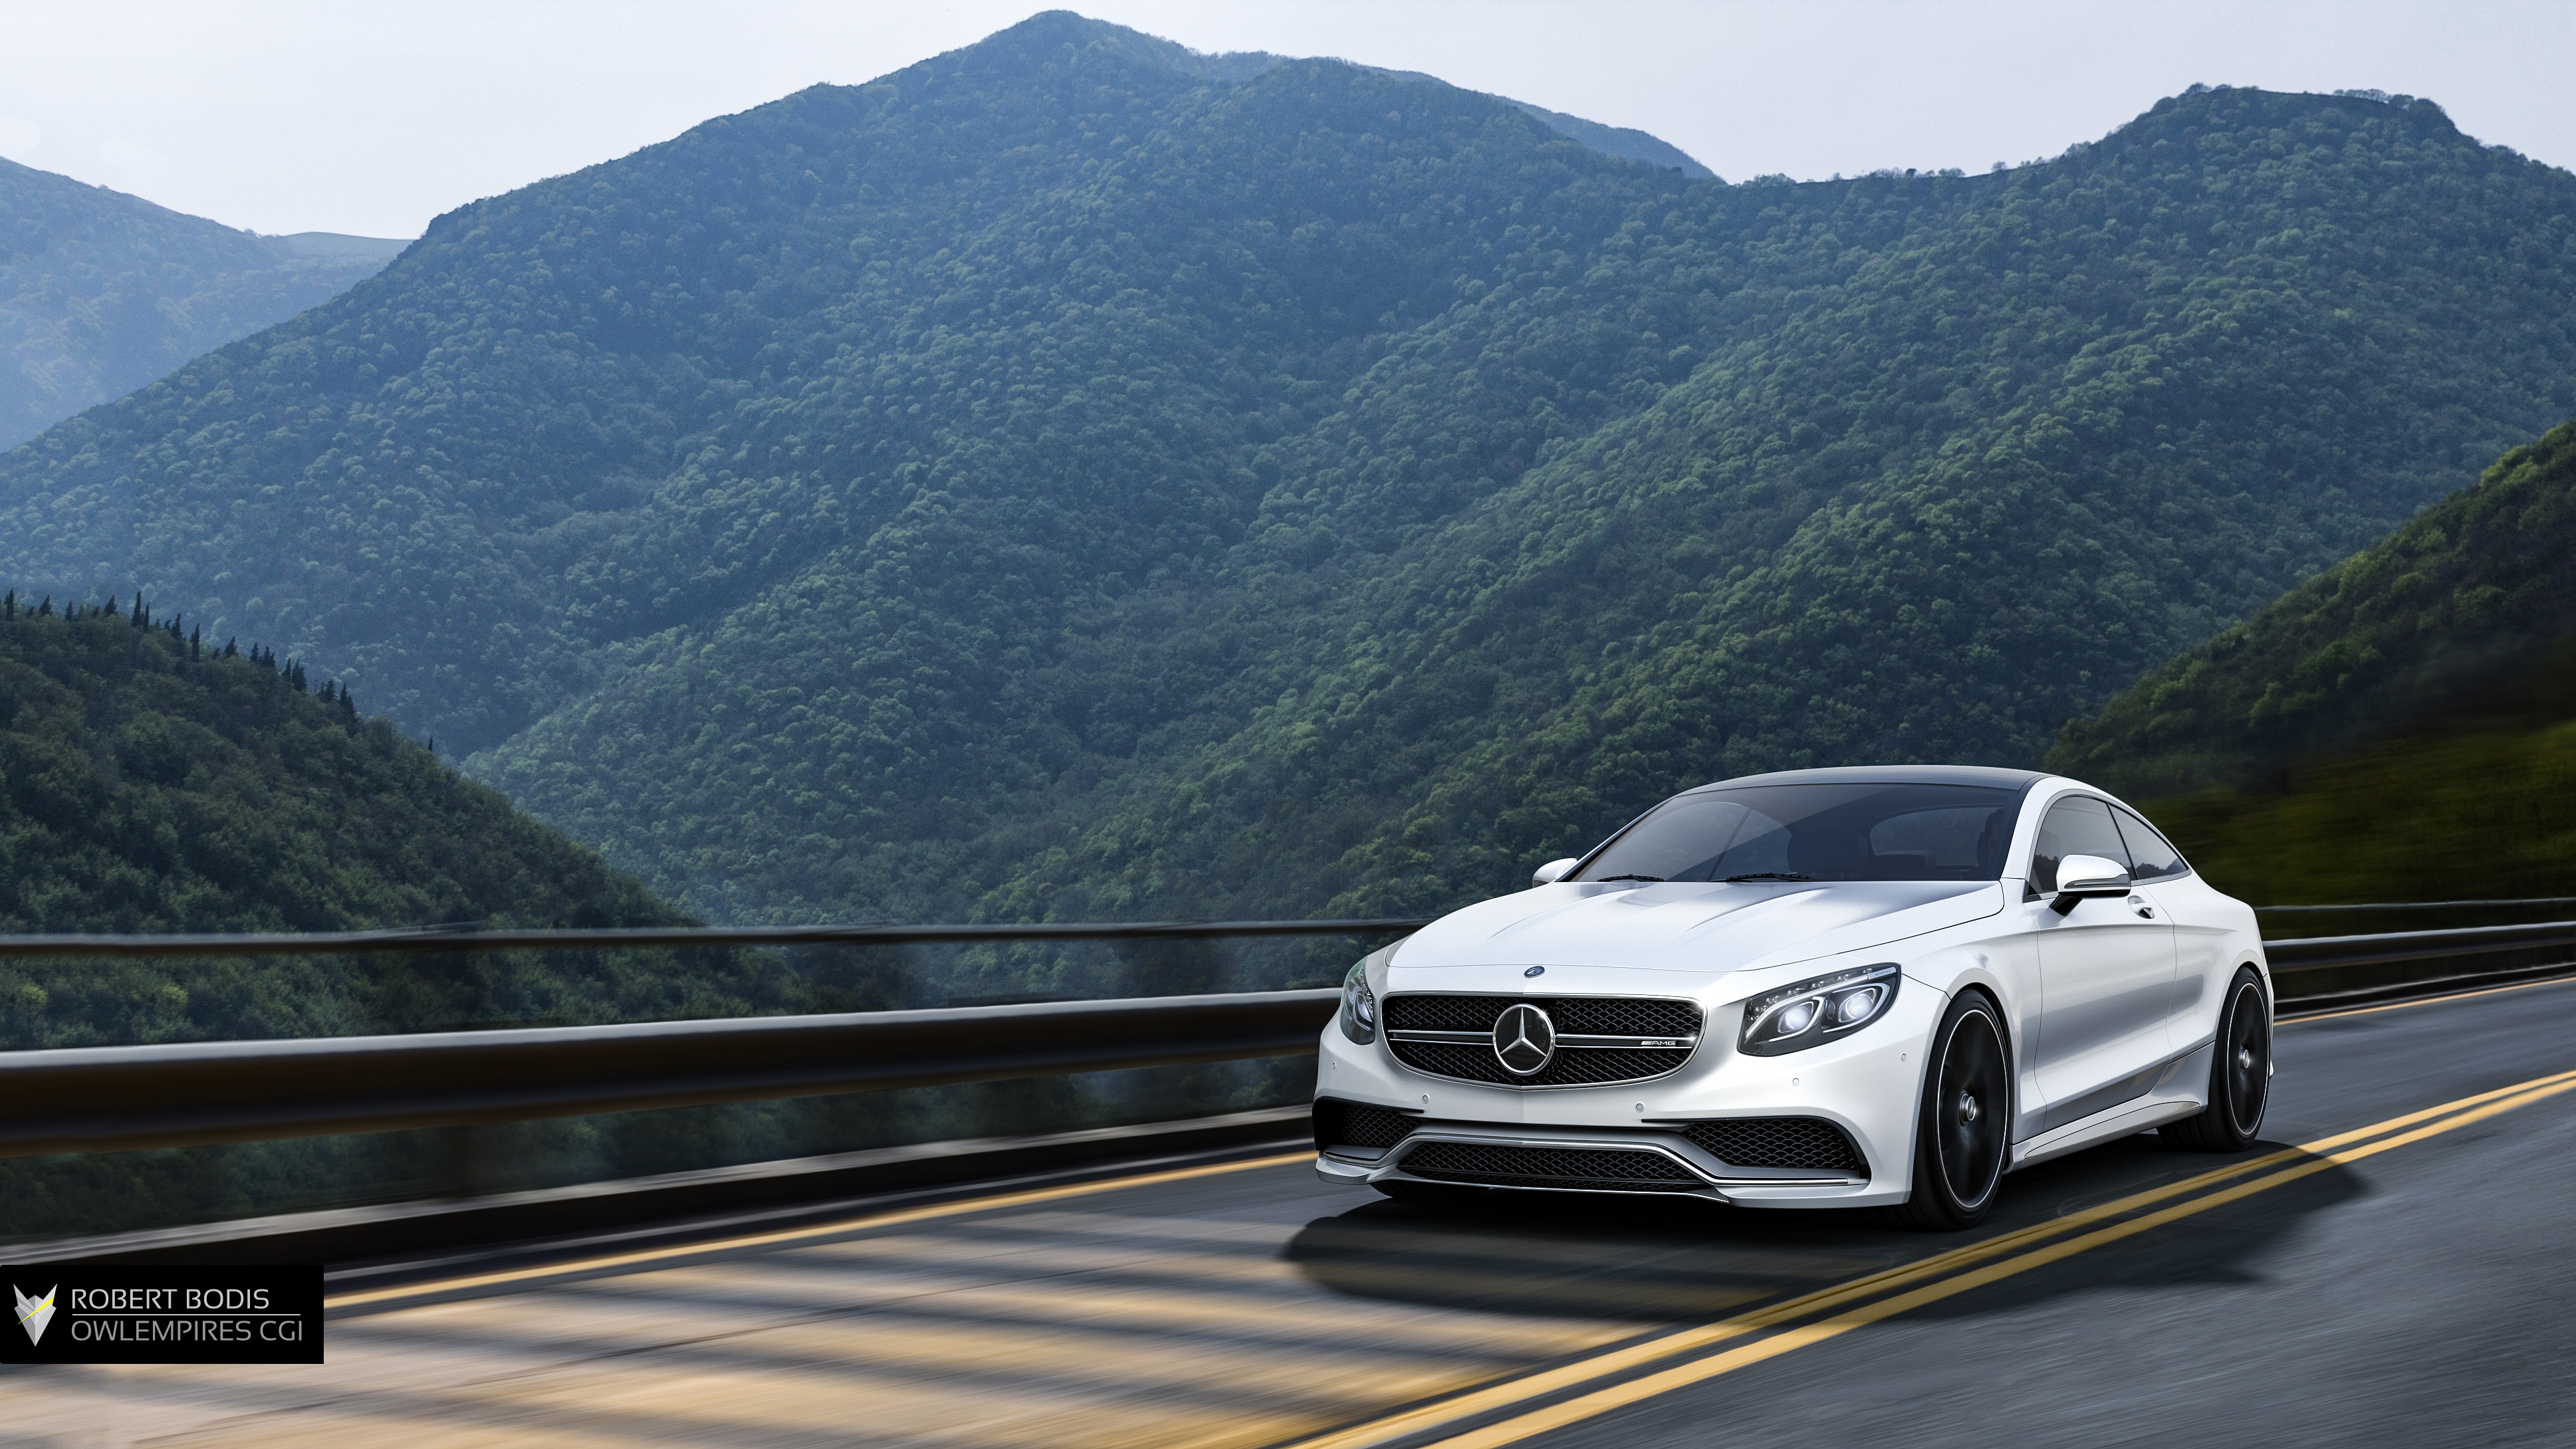
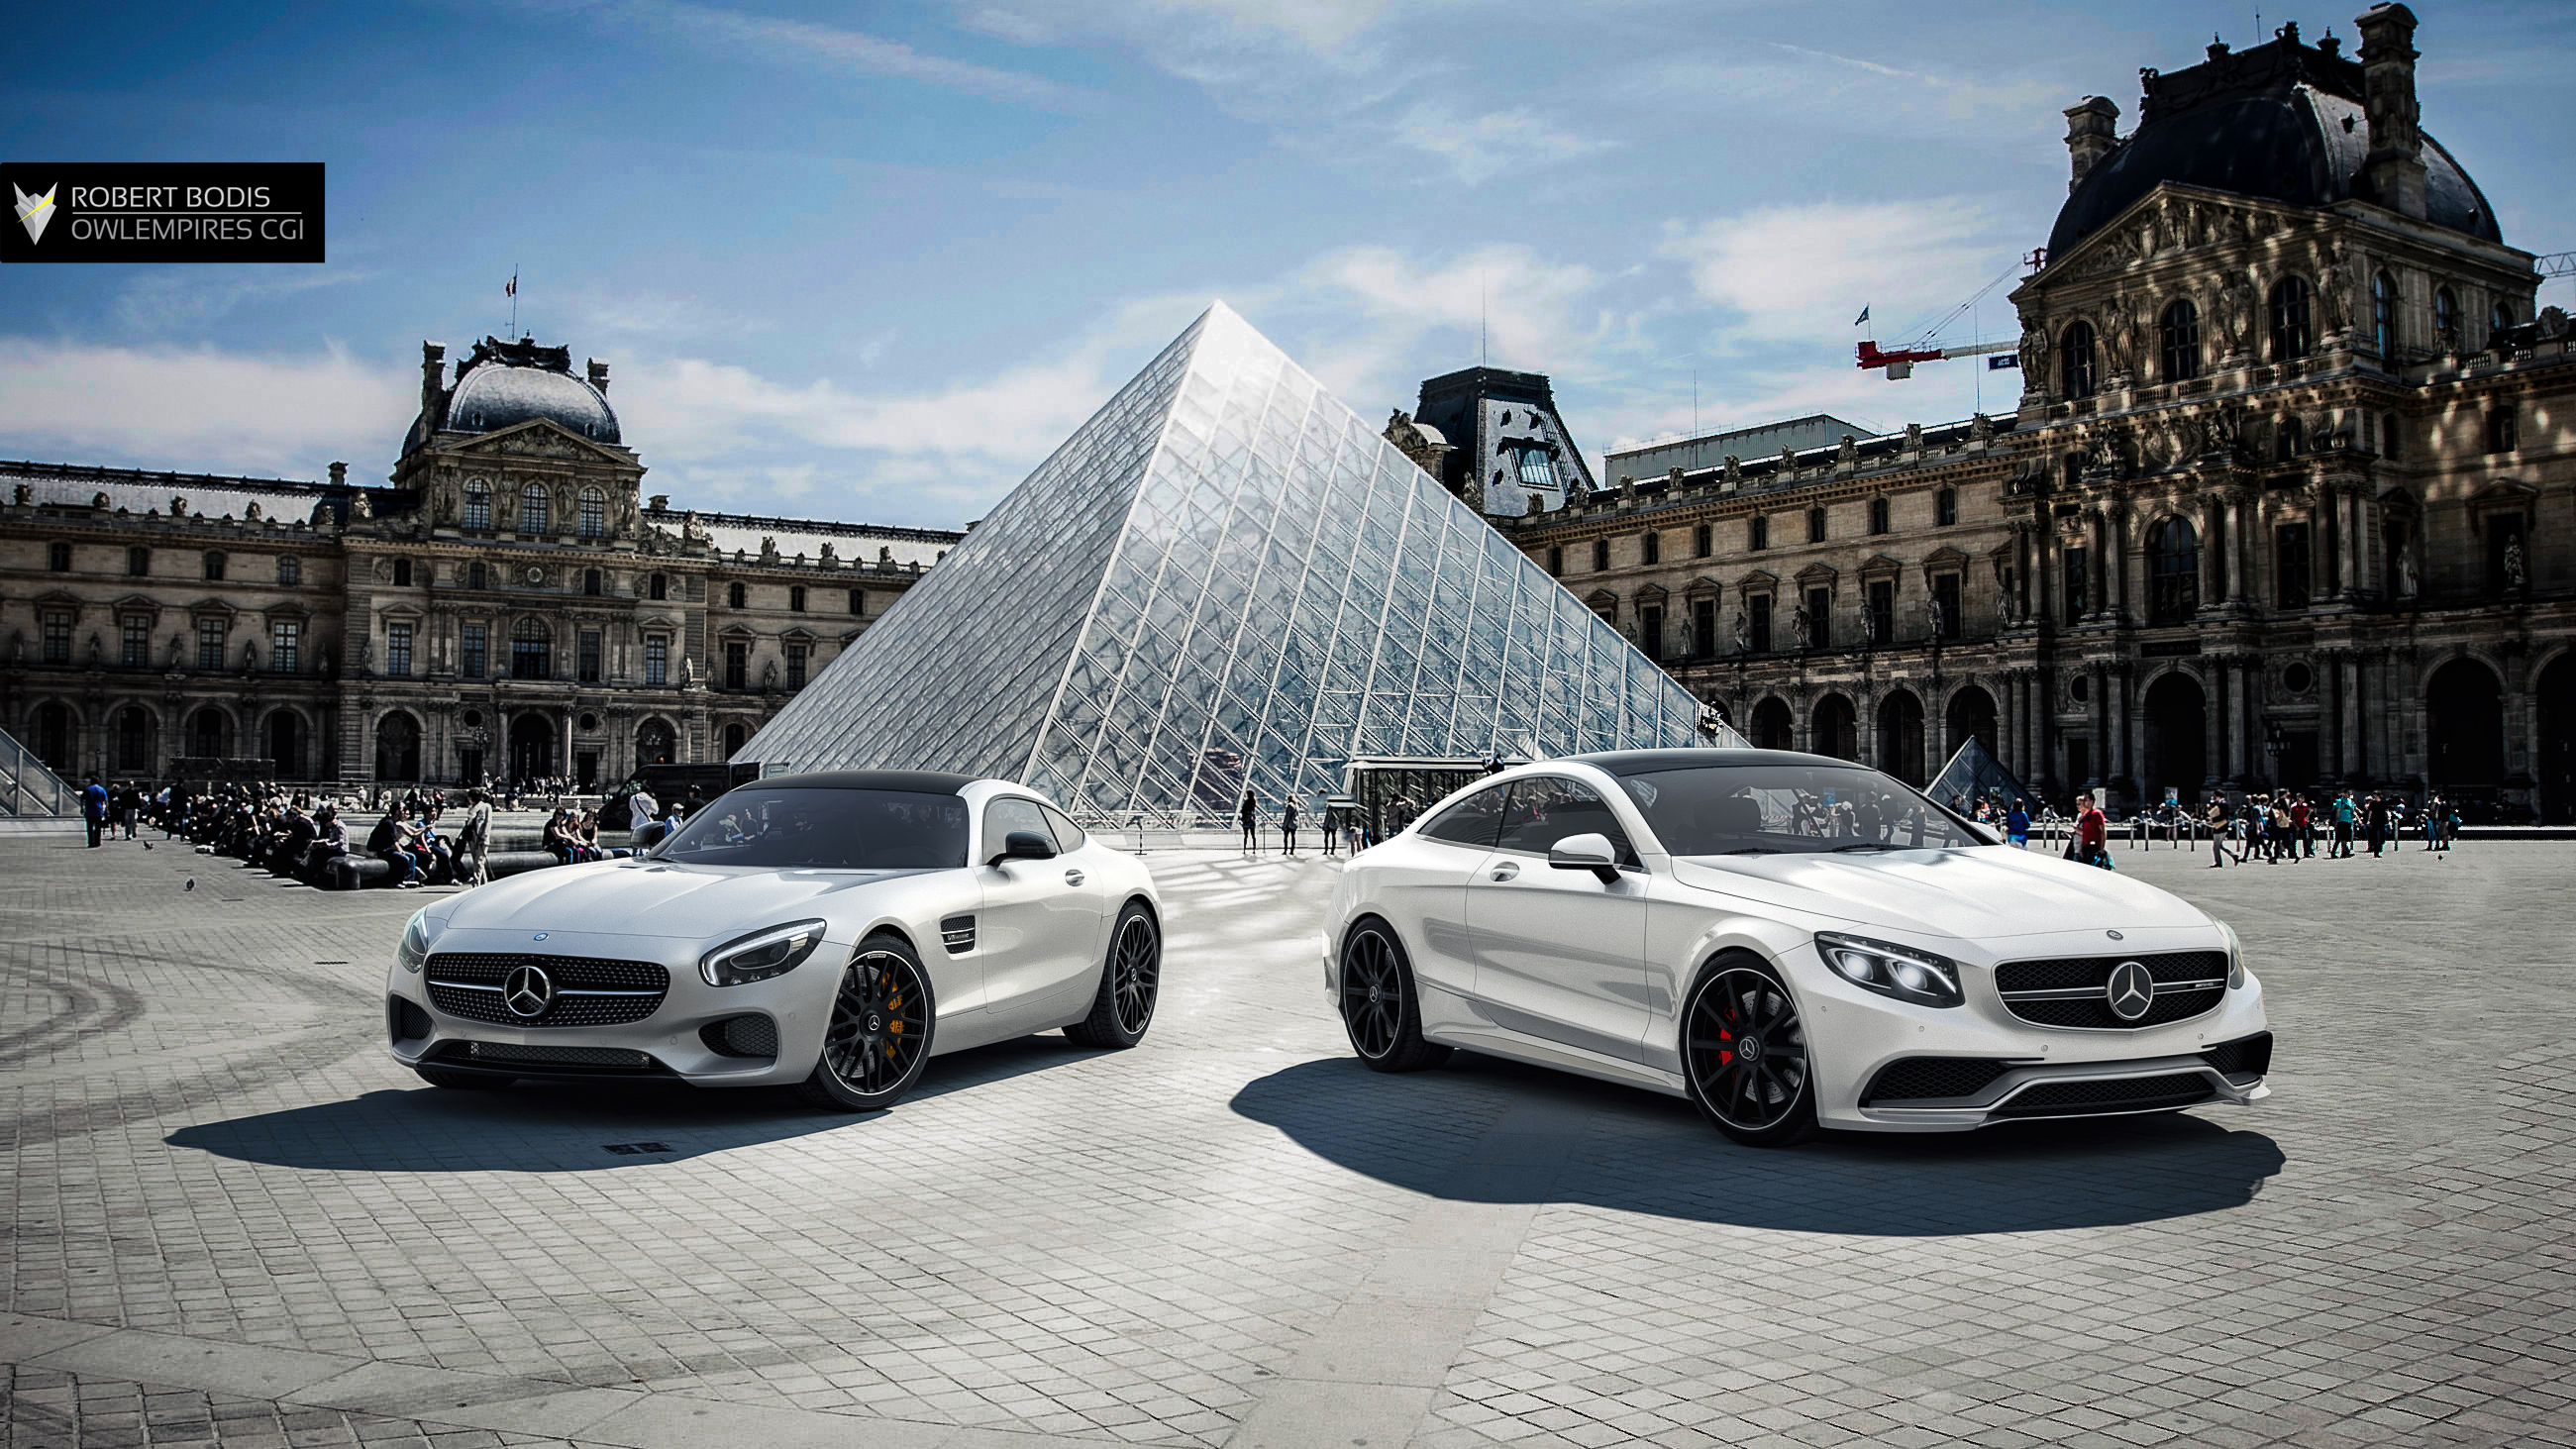
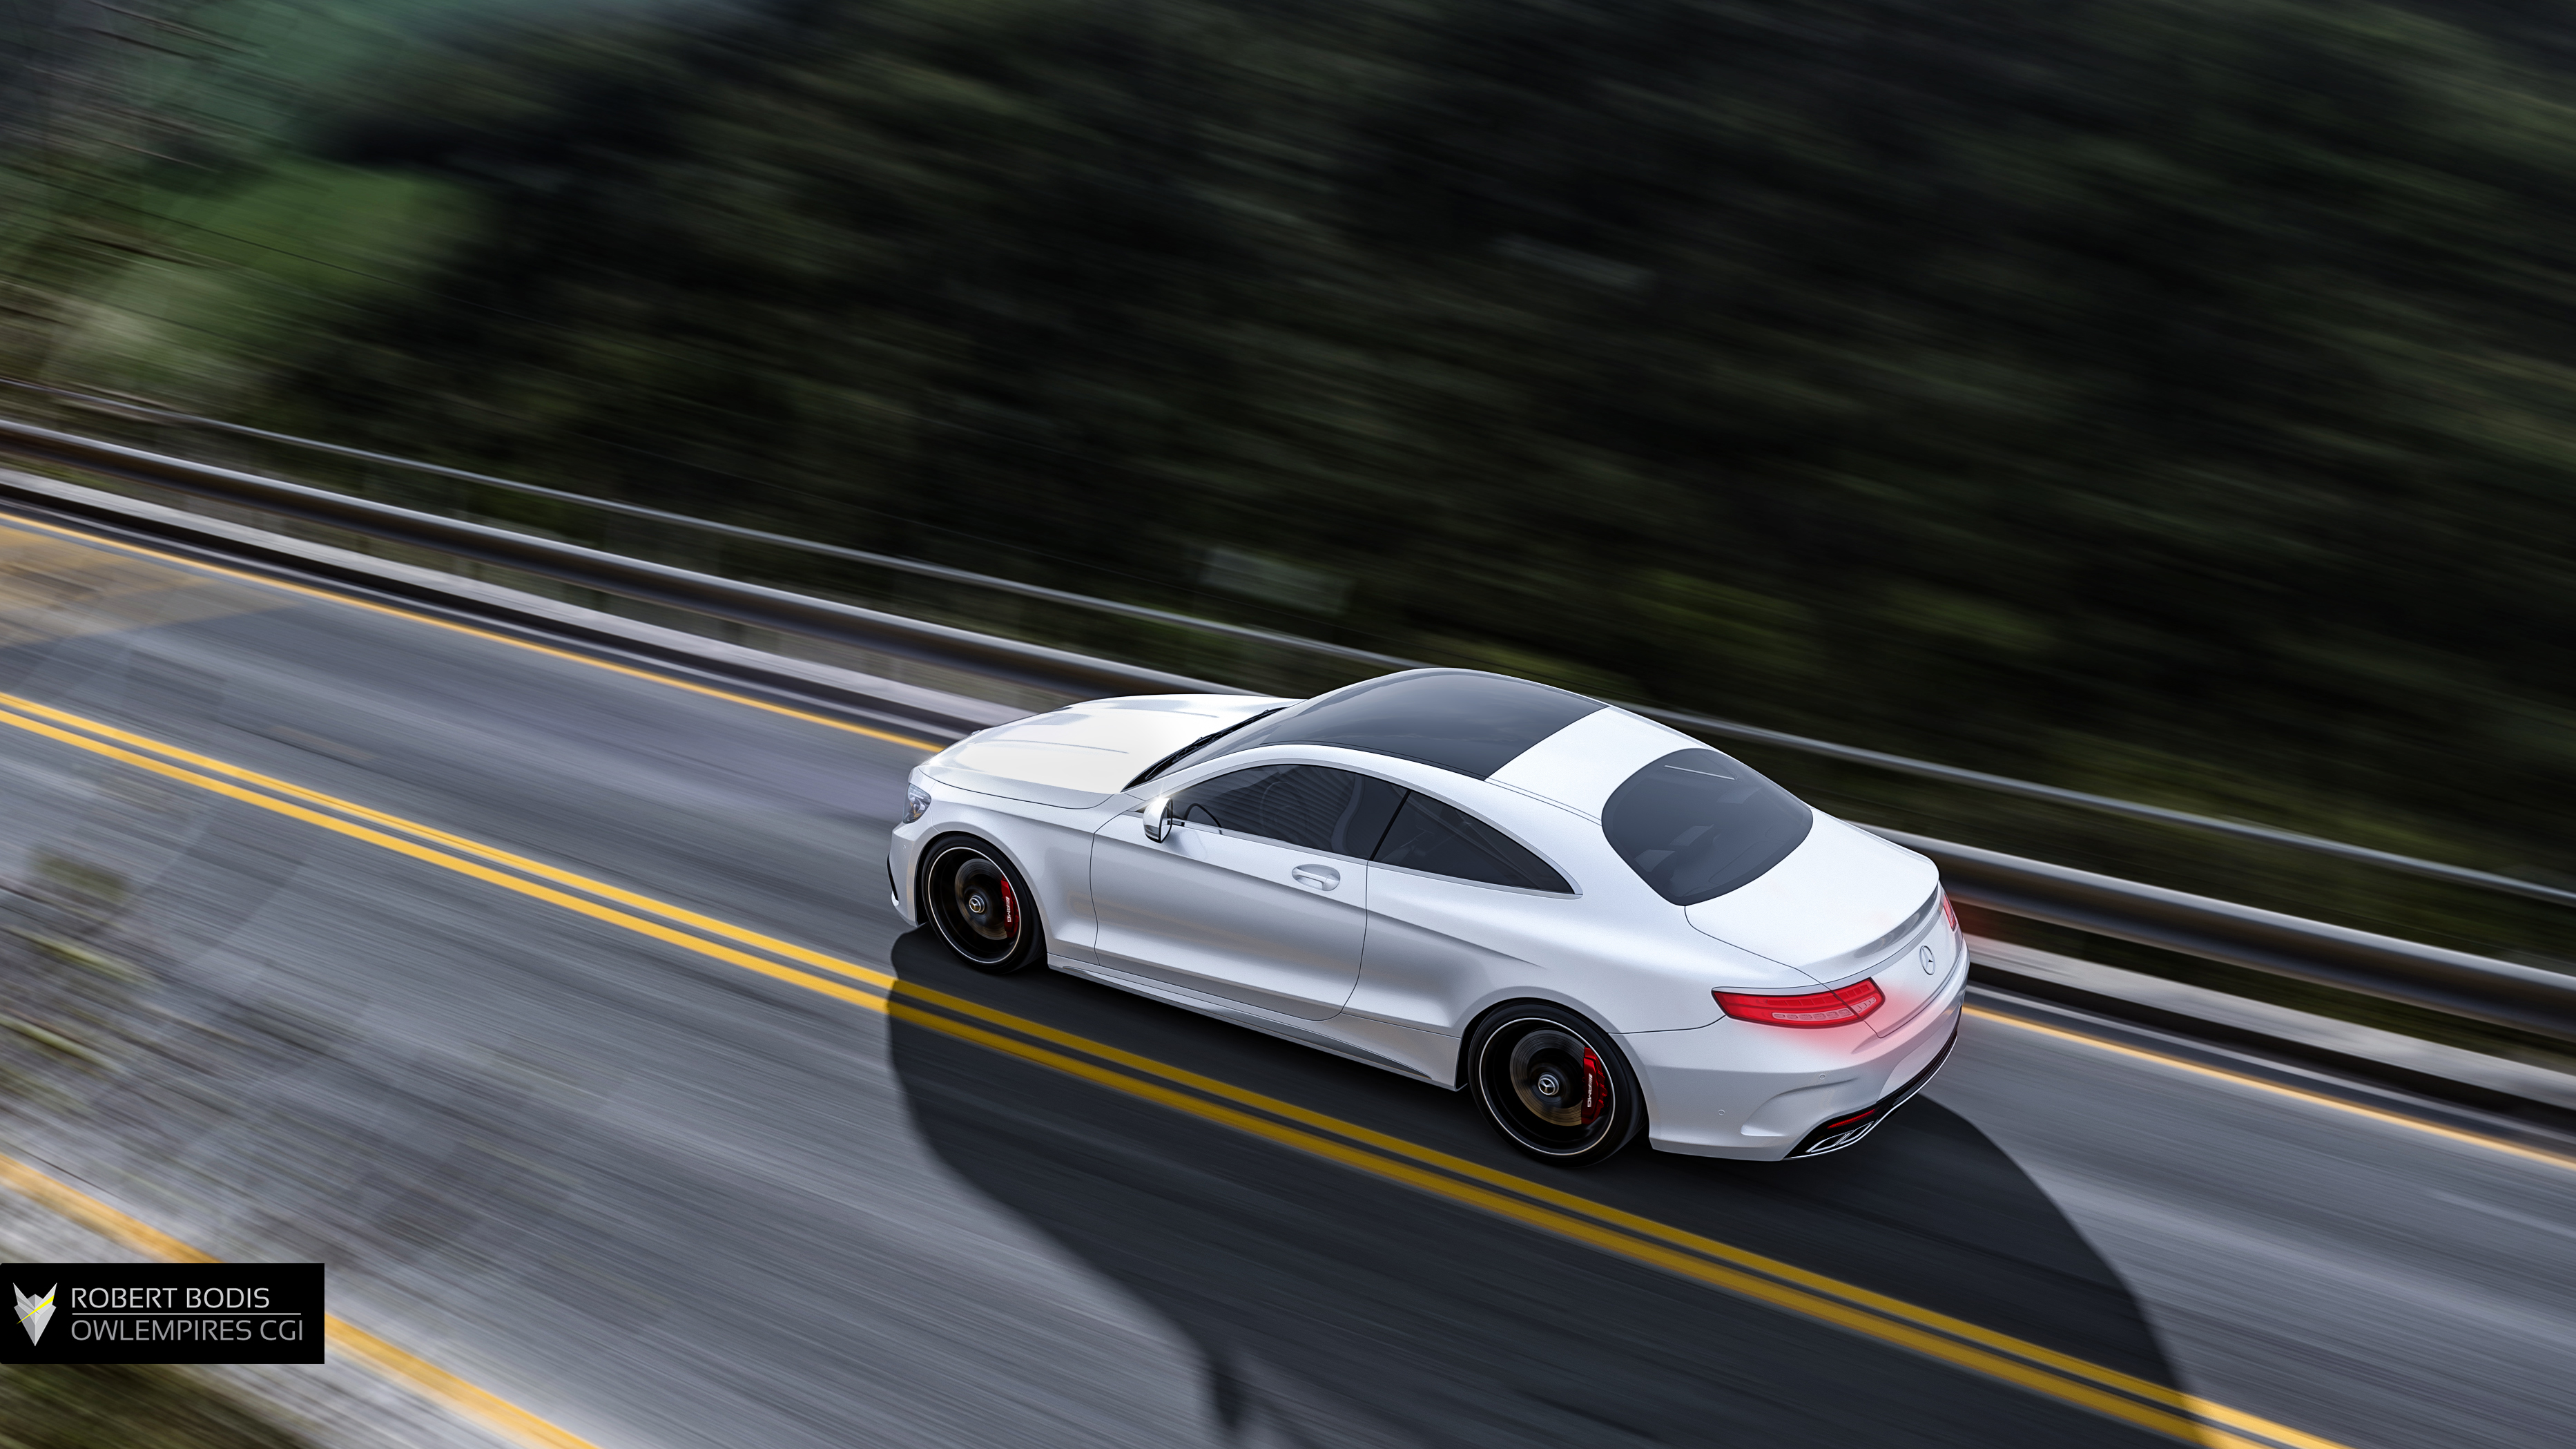
2015 Mercedes S63 AMG Coupe
The vehicle model comes from squir.com, who have great quad based models of almost every vehicle on the planet. 90% of the time I use Squir models, except in those cases where I have a CAD version of the vehicle from the manufacturer.
I shot the HDRI and Backplate myself in Italy/Fabriano . I used a borrowed Canon 1100D. It is quite an old camera with around 12 megapixels, clarity was not the best, but still usable.
The HDRI was a bit tricky here. I did shoot an HDRI at the same time as I shot these backplates to have matching lights; however, the EV range was too low, so it didn’t look good at all.
Instead, I ended up using an HDRI from a “road bundle” I bought from HDRI–Haven. With a little tweaking I could manage to make it fit the backplate perfectly.
With this render, I was going after simplicity, and that is why I was going with a white paint job. I really felt that the quite dark background and those yellow lines will help to frame in the vehicle, especially if it is something like a Metallic Grey or Pearl White.
I’d like to invite you to take a look of how this scene was built in the video below. Please understand that the video is a walkthrough and not a tutorial! This is true of all the videos on our channel, for the moment at least. It may contain useful info that will help you in the future, but you should have a basic knowledge of 3ds Max, Corona Renderer and Photoshop.
2014 Maserati Ghibli

The vehicle model comes from squir.com again, and had a polygon count is around 4 million, while both HDRI and Backplate were bought from HDRI-Haven. The location is called “Red Hill” .
I always had a thing for Maserati so I got very excited once I’ve put my hands on one of their models! My personal favorite is the Quattroporte from around 2005-ish. However the new Ghibli looks just as great ! I already had a backplate that was begging for dark colored car, so here it is!
This was one of those projects where the light direction always looked off. I chose to render the vehicle multiple times, each time with a different light setup. Later on I could just simply blend these together, and mask out the segments which I did not like. While that is definitely time consuming, if you don’t want to manually add small lights to your HDRI, this is the fastest way to go.
Photographers are more familiar with this technique – however they use it for still shots and not moving ones.
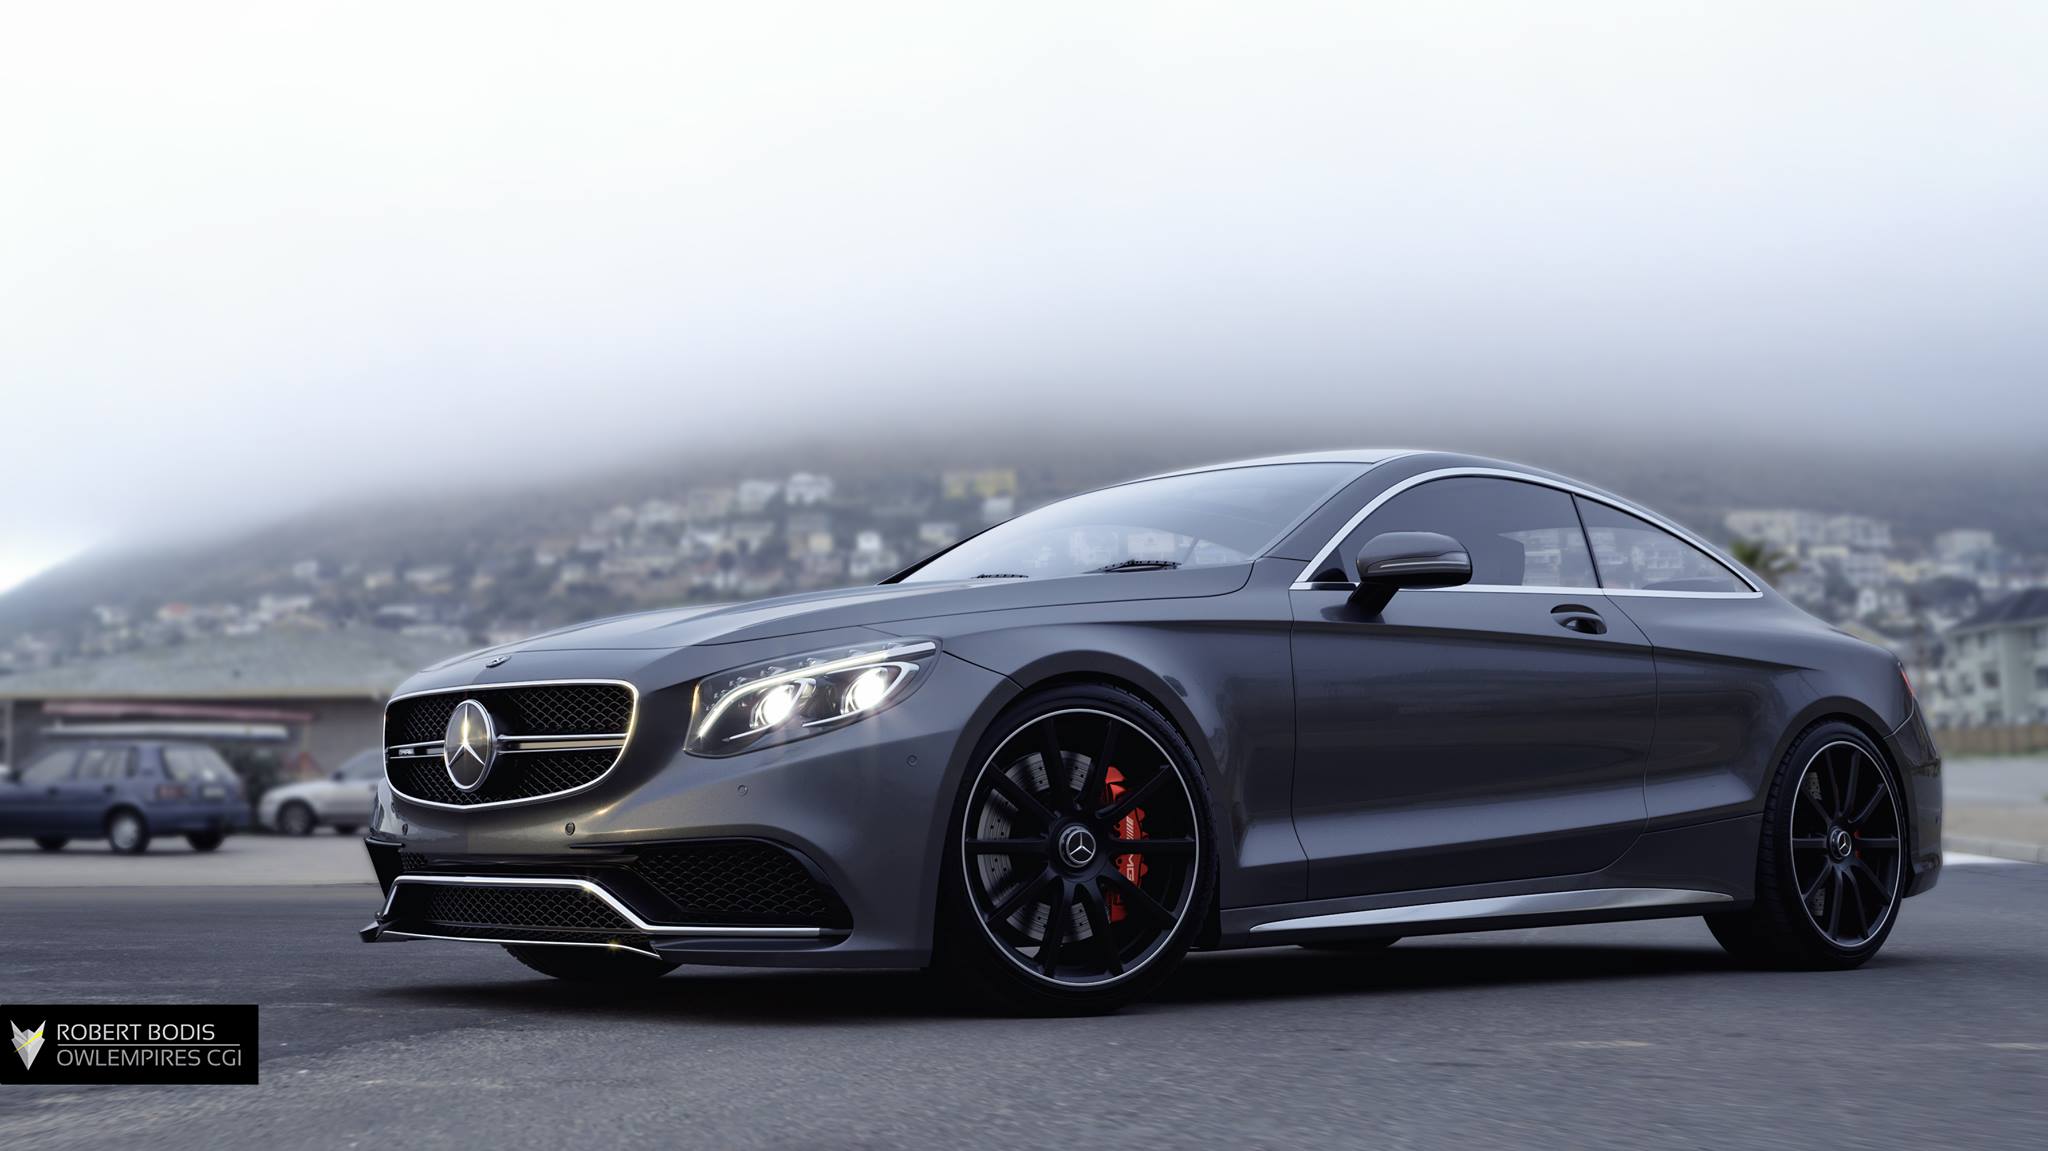
2016 Mercedes-Benz AMG GT S
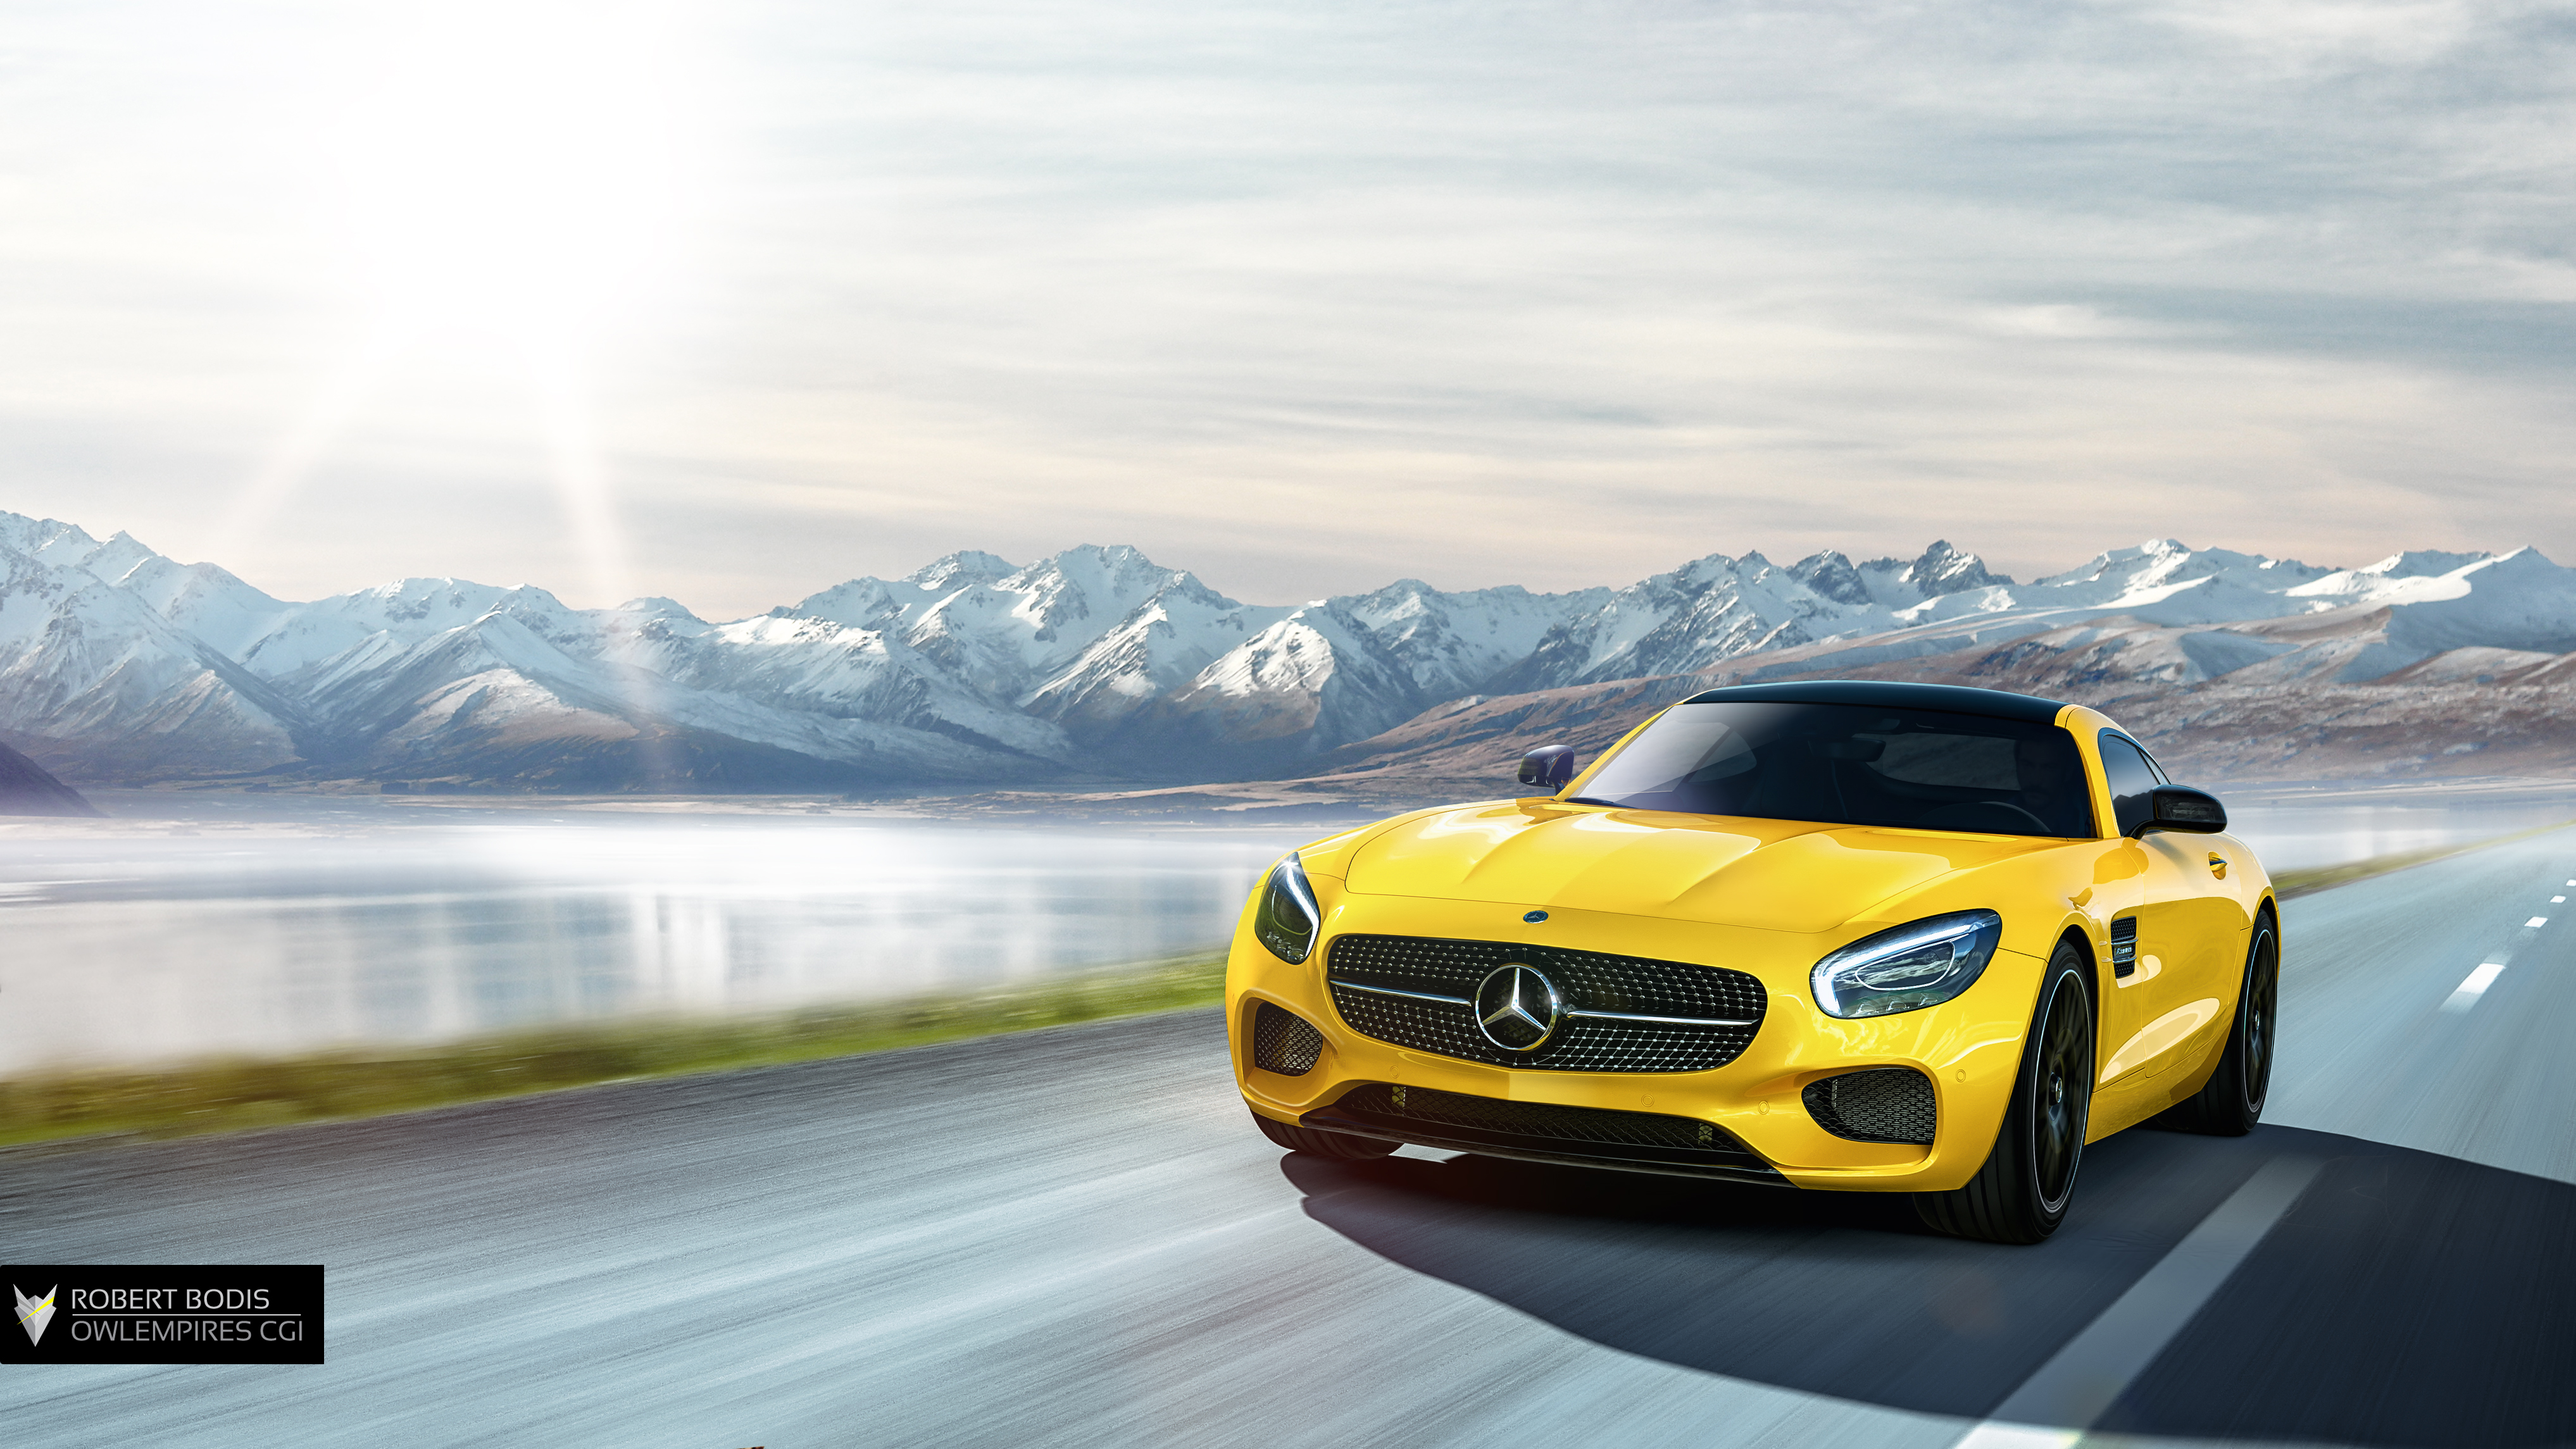
The vehicle model comes from squir.com – just as with my previous projects with squir models, this one is hitting the 5 million polygon mark as well.
The HDRI & Backplate were kindly provided by HDRI-locations.com. They have lots of beautiful locations and great prices for excellent resolution. This particular one was shot in Iceland, a beautiful view near the Ocean.
I probably spent most of my time on this particular render. I got the HDRI and a set of backplates from HDRI-Locations, I picked the backplate and it was time to match them. When I aligned them properly, so the sun in the HDRI is at the exact same spot where the backplate had it, I ran into some trouble – the reflection on the vehicle looked really bad.
Jeff Patton gave me a great idea, to remove the sun from the HDRI, rotate it as I wish, then just use a CoronaSun for the lightsource. This way I was able to have the perfect rotation degree for my HDRI. After several test renders, I went for the full resolution one.
Once the post-production was done, I was really happy with the result. However as the weeks passed by and I made more renders of the other vehicles, I started doubting if it was the right call to do it that way (you can see the previous version in the video).
It’s perfectly normal to not like your previous projects, especially if you are as critical about everything as I am! So basically, not liking it anymore didn’t mean much by itself. However, I was getting the same feedback from others as well, and we realized it was just the match-up between the location and vehicle.
I did not want to re-render the whole scene again, since I’d done a lot of reflection corrections to the vehicle and I just didn’t felt like going through all that once more. Sadly my reflections were not aligning up on the side, so I had to draw those back with a brush. Not to mention some other segments where I felt the need to add or remove a certain reflections.
I decided to change the backplate, or at least the top part of it. I found a very nice stock photo from Pexels of a mountain line that matched perfectly. In the original render, I had a massive mountain on the right side of the vehicle, and it was really drawing focus away from the car, so it was good to change that.
2015 McLaren 570S Exterior
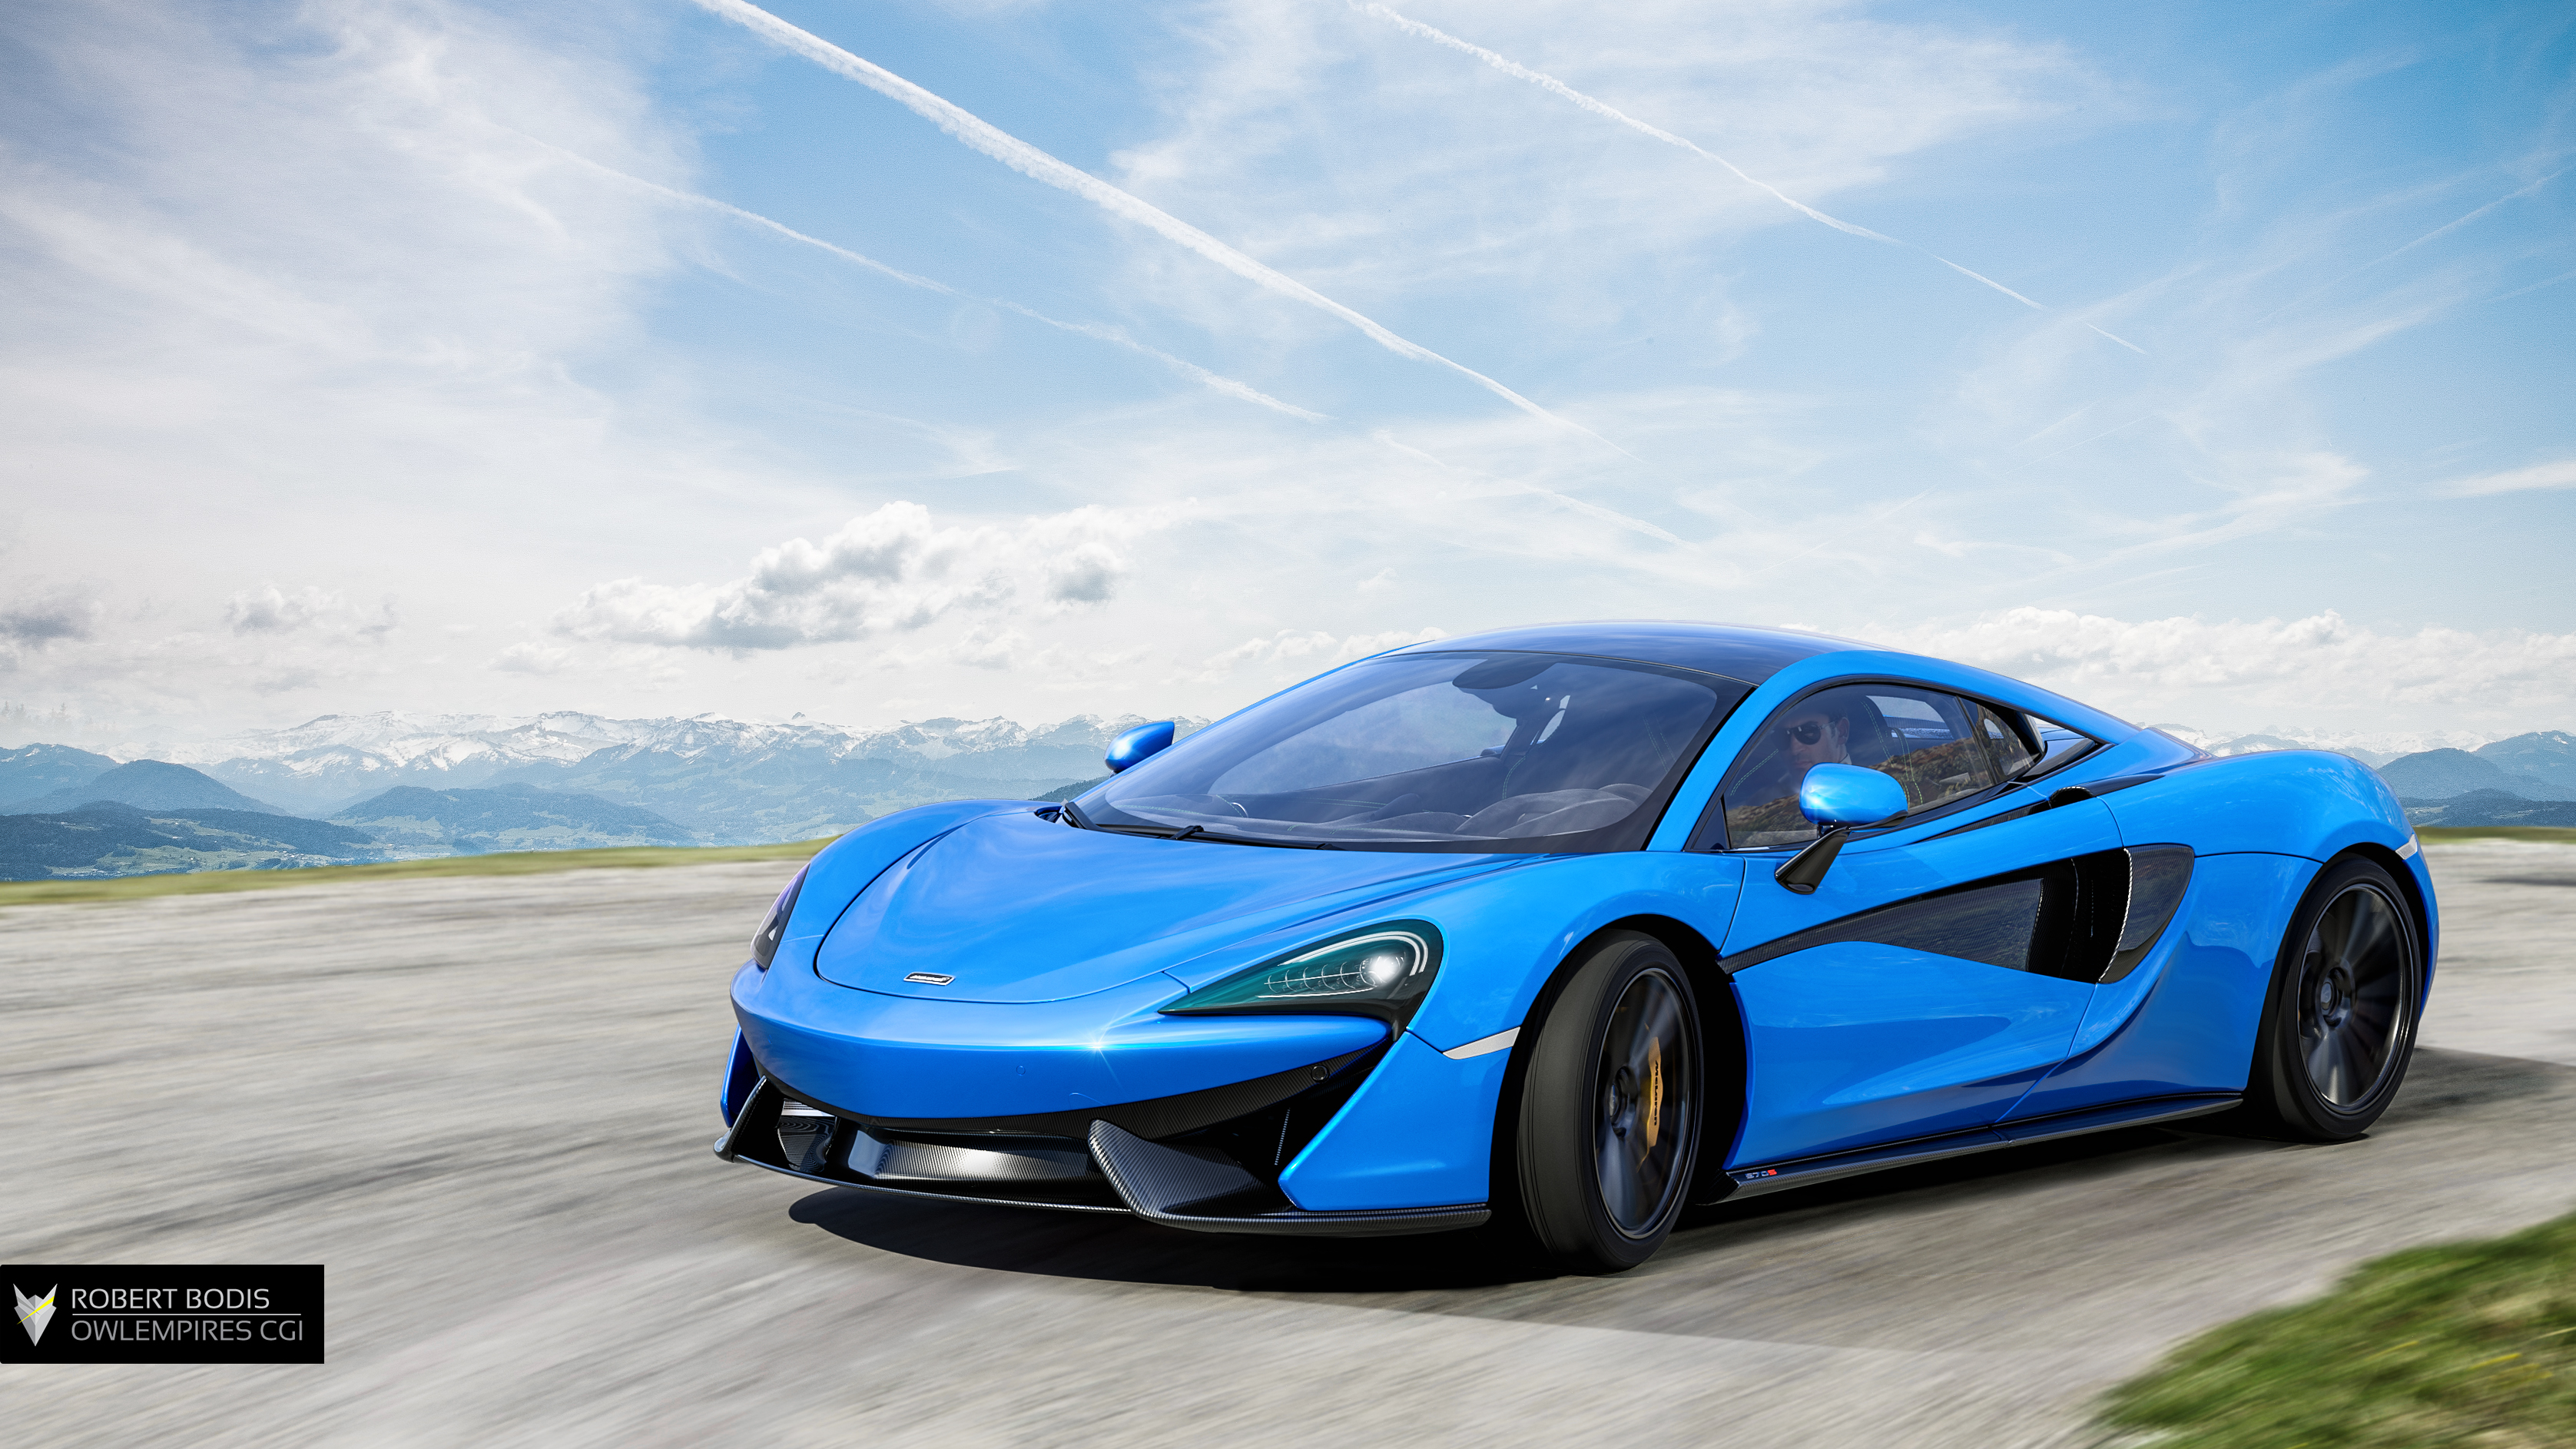
The vehicle model was a CAD-based model from Rex Fu. Top notch quality!
The HDRI and Backplate are from HDRI-Haven once again. I ended up using a “CoronaMix” with two HDRI domes plugged into them. It may not be the best solution, since my performance dropped big time, but it helped me manually adjust one of the HDRI’s. The backplate I shot myself in Italy, however the mountains and sky are from Pexels as usual!
The day after I landed in Italy, we decided to drive up to the highest mountain in that area, and despite the ridiculous cold and wind, we found some great looking roads without any barriers or other annoying objects.
However, I ended up adding another backplate for the top part of the image, as the original one was a bit boring and had quite a visible haze, not to mention the noise. (This original is visible in the walkthrough video as well.)
2015 McLaren 570S Interior
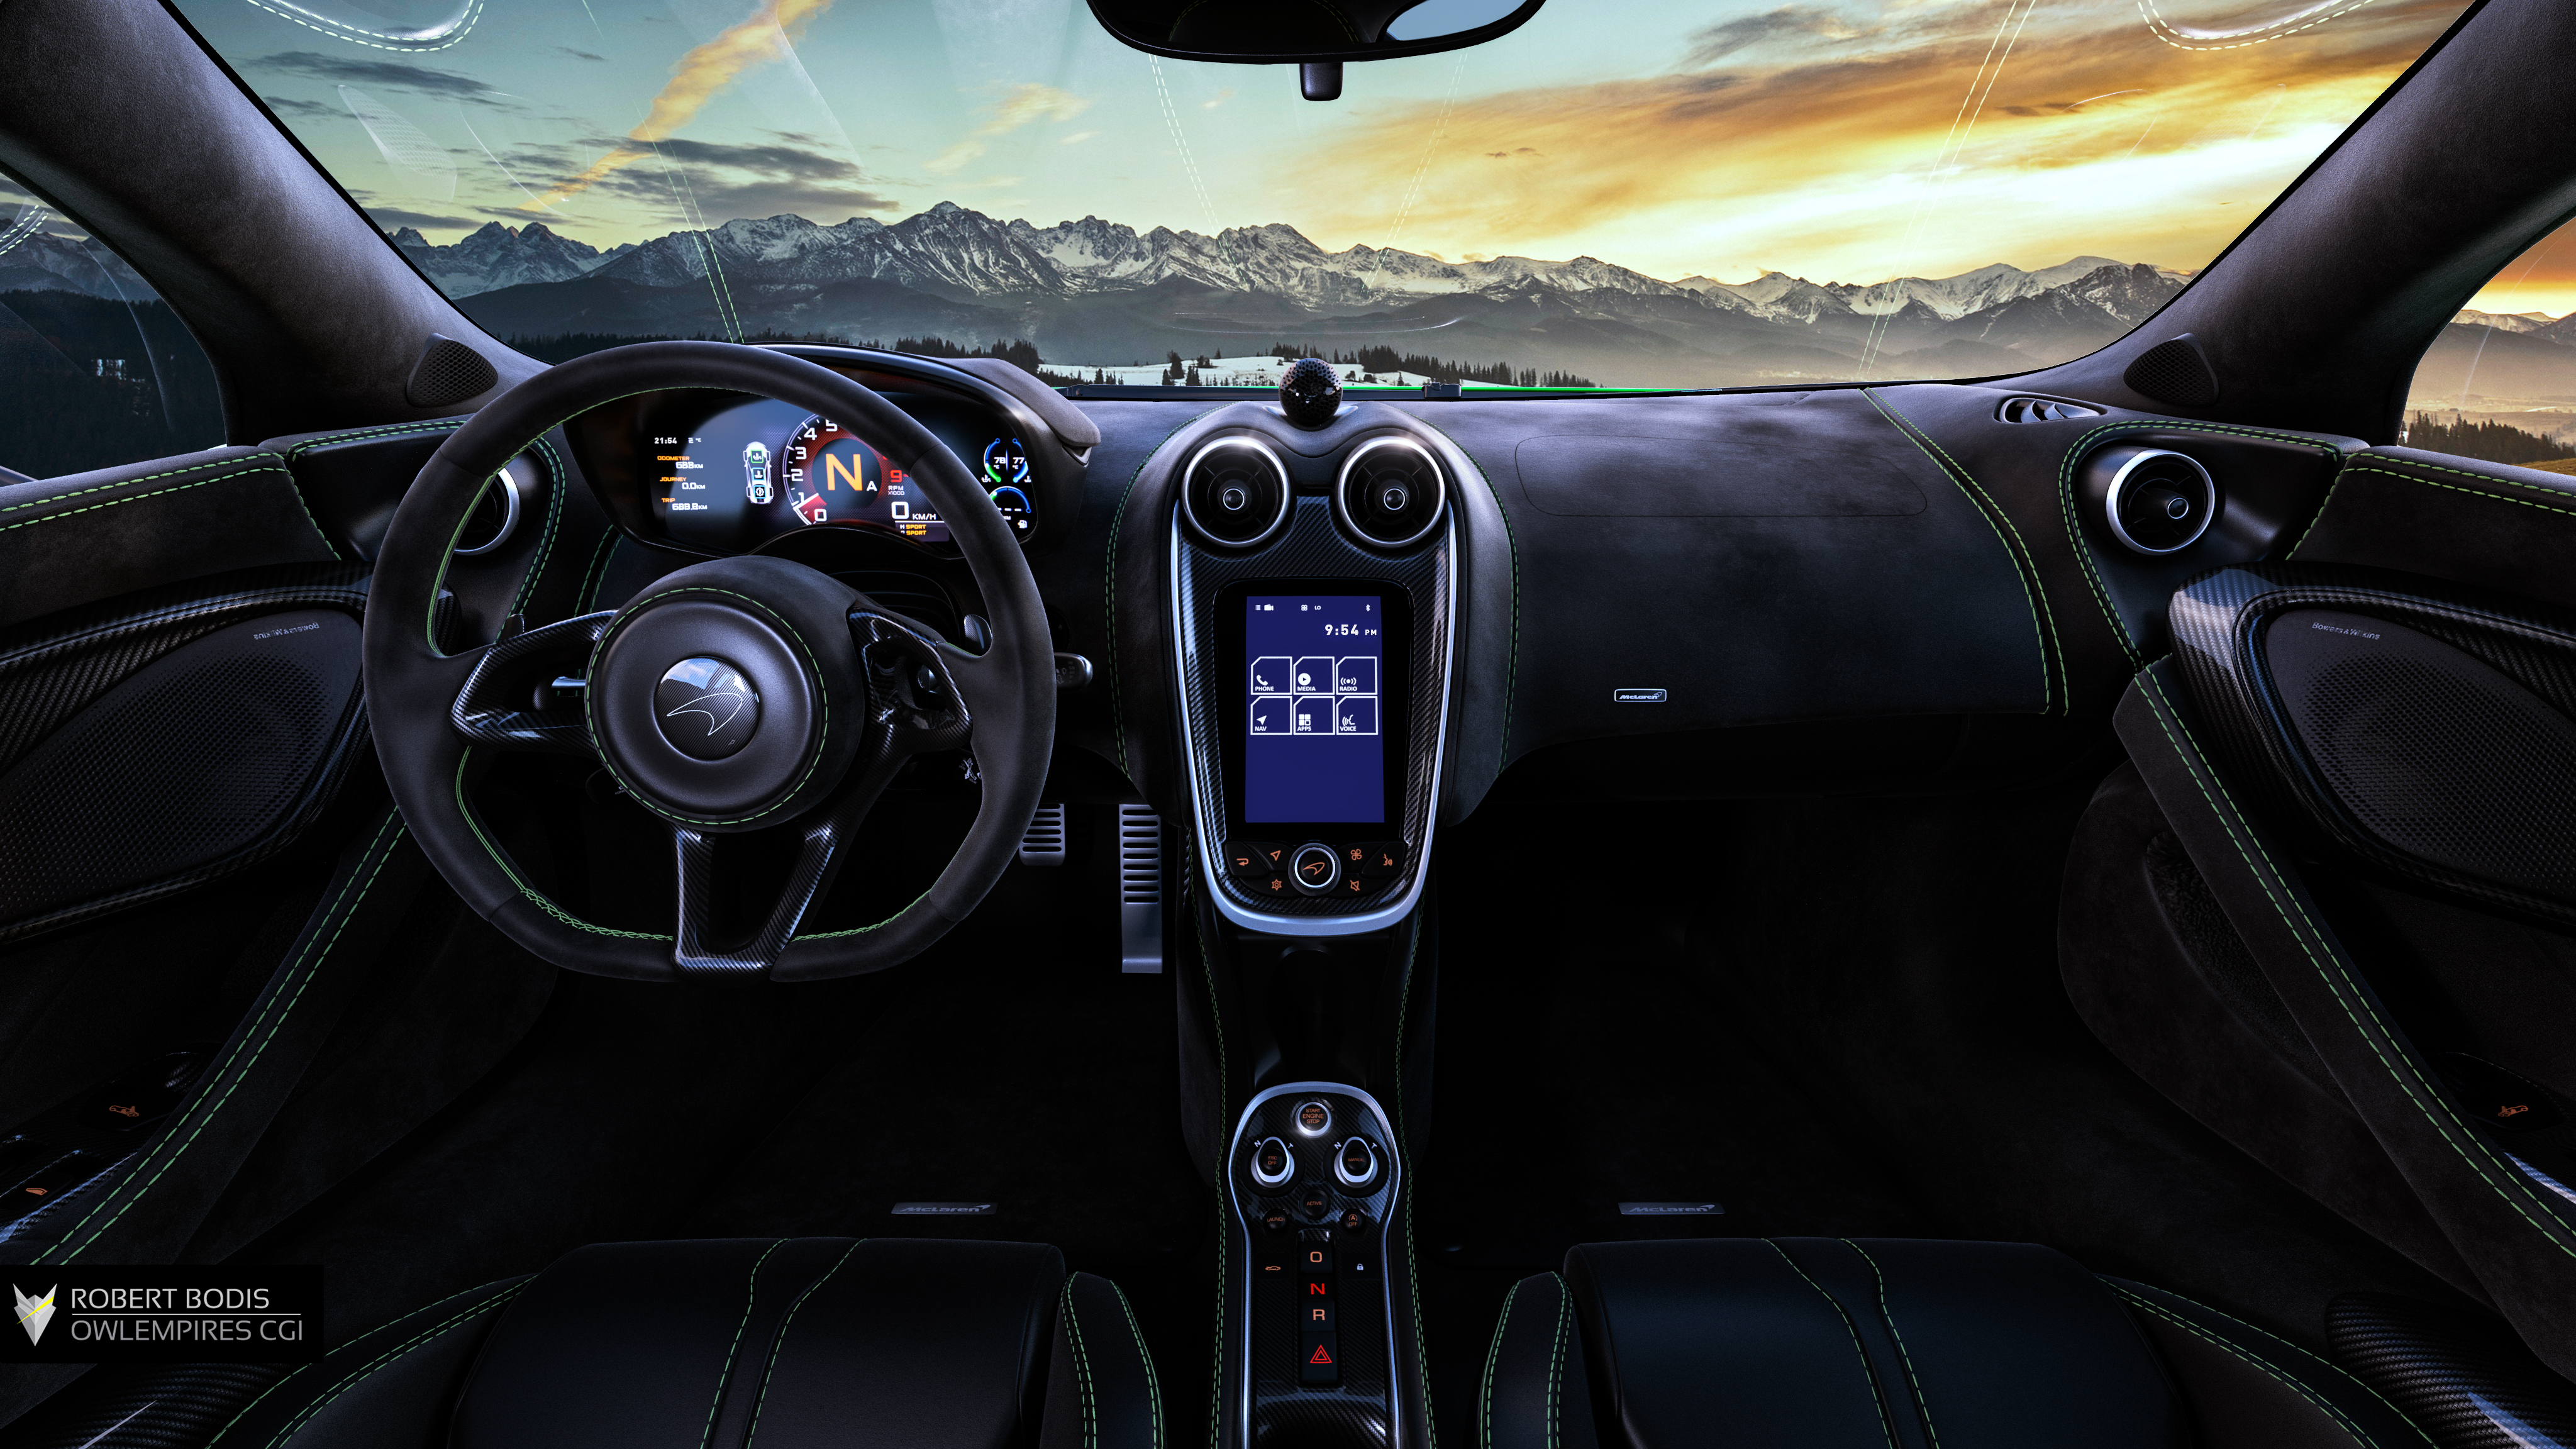
This is the same vehicle model from Rex Fu as used for the exterior shots. For the HDRI and Backplate; I used a Pexels stock photo as a backplate and a Peter Guthrie sky to light up the scene, with an additional CoronaLight on the inside.
The scene was very simple. I used a simple HDRI from Peter and a CoronaLight that was face to face with the HDRI’s sun. This way my shadows cast from the sun disappeared.
Now, the sky that was visible from the HDRI looked really good as well, but without having any mountains or buildings in front, the vehicle looked like it’s doing a wheelie! So that lead to adding in the backplate from Pexels.
A stereoscopic interior can be viewed below on YouTube, and a downloadable stereoscopic image is provided too :
Nissan S13
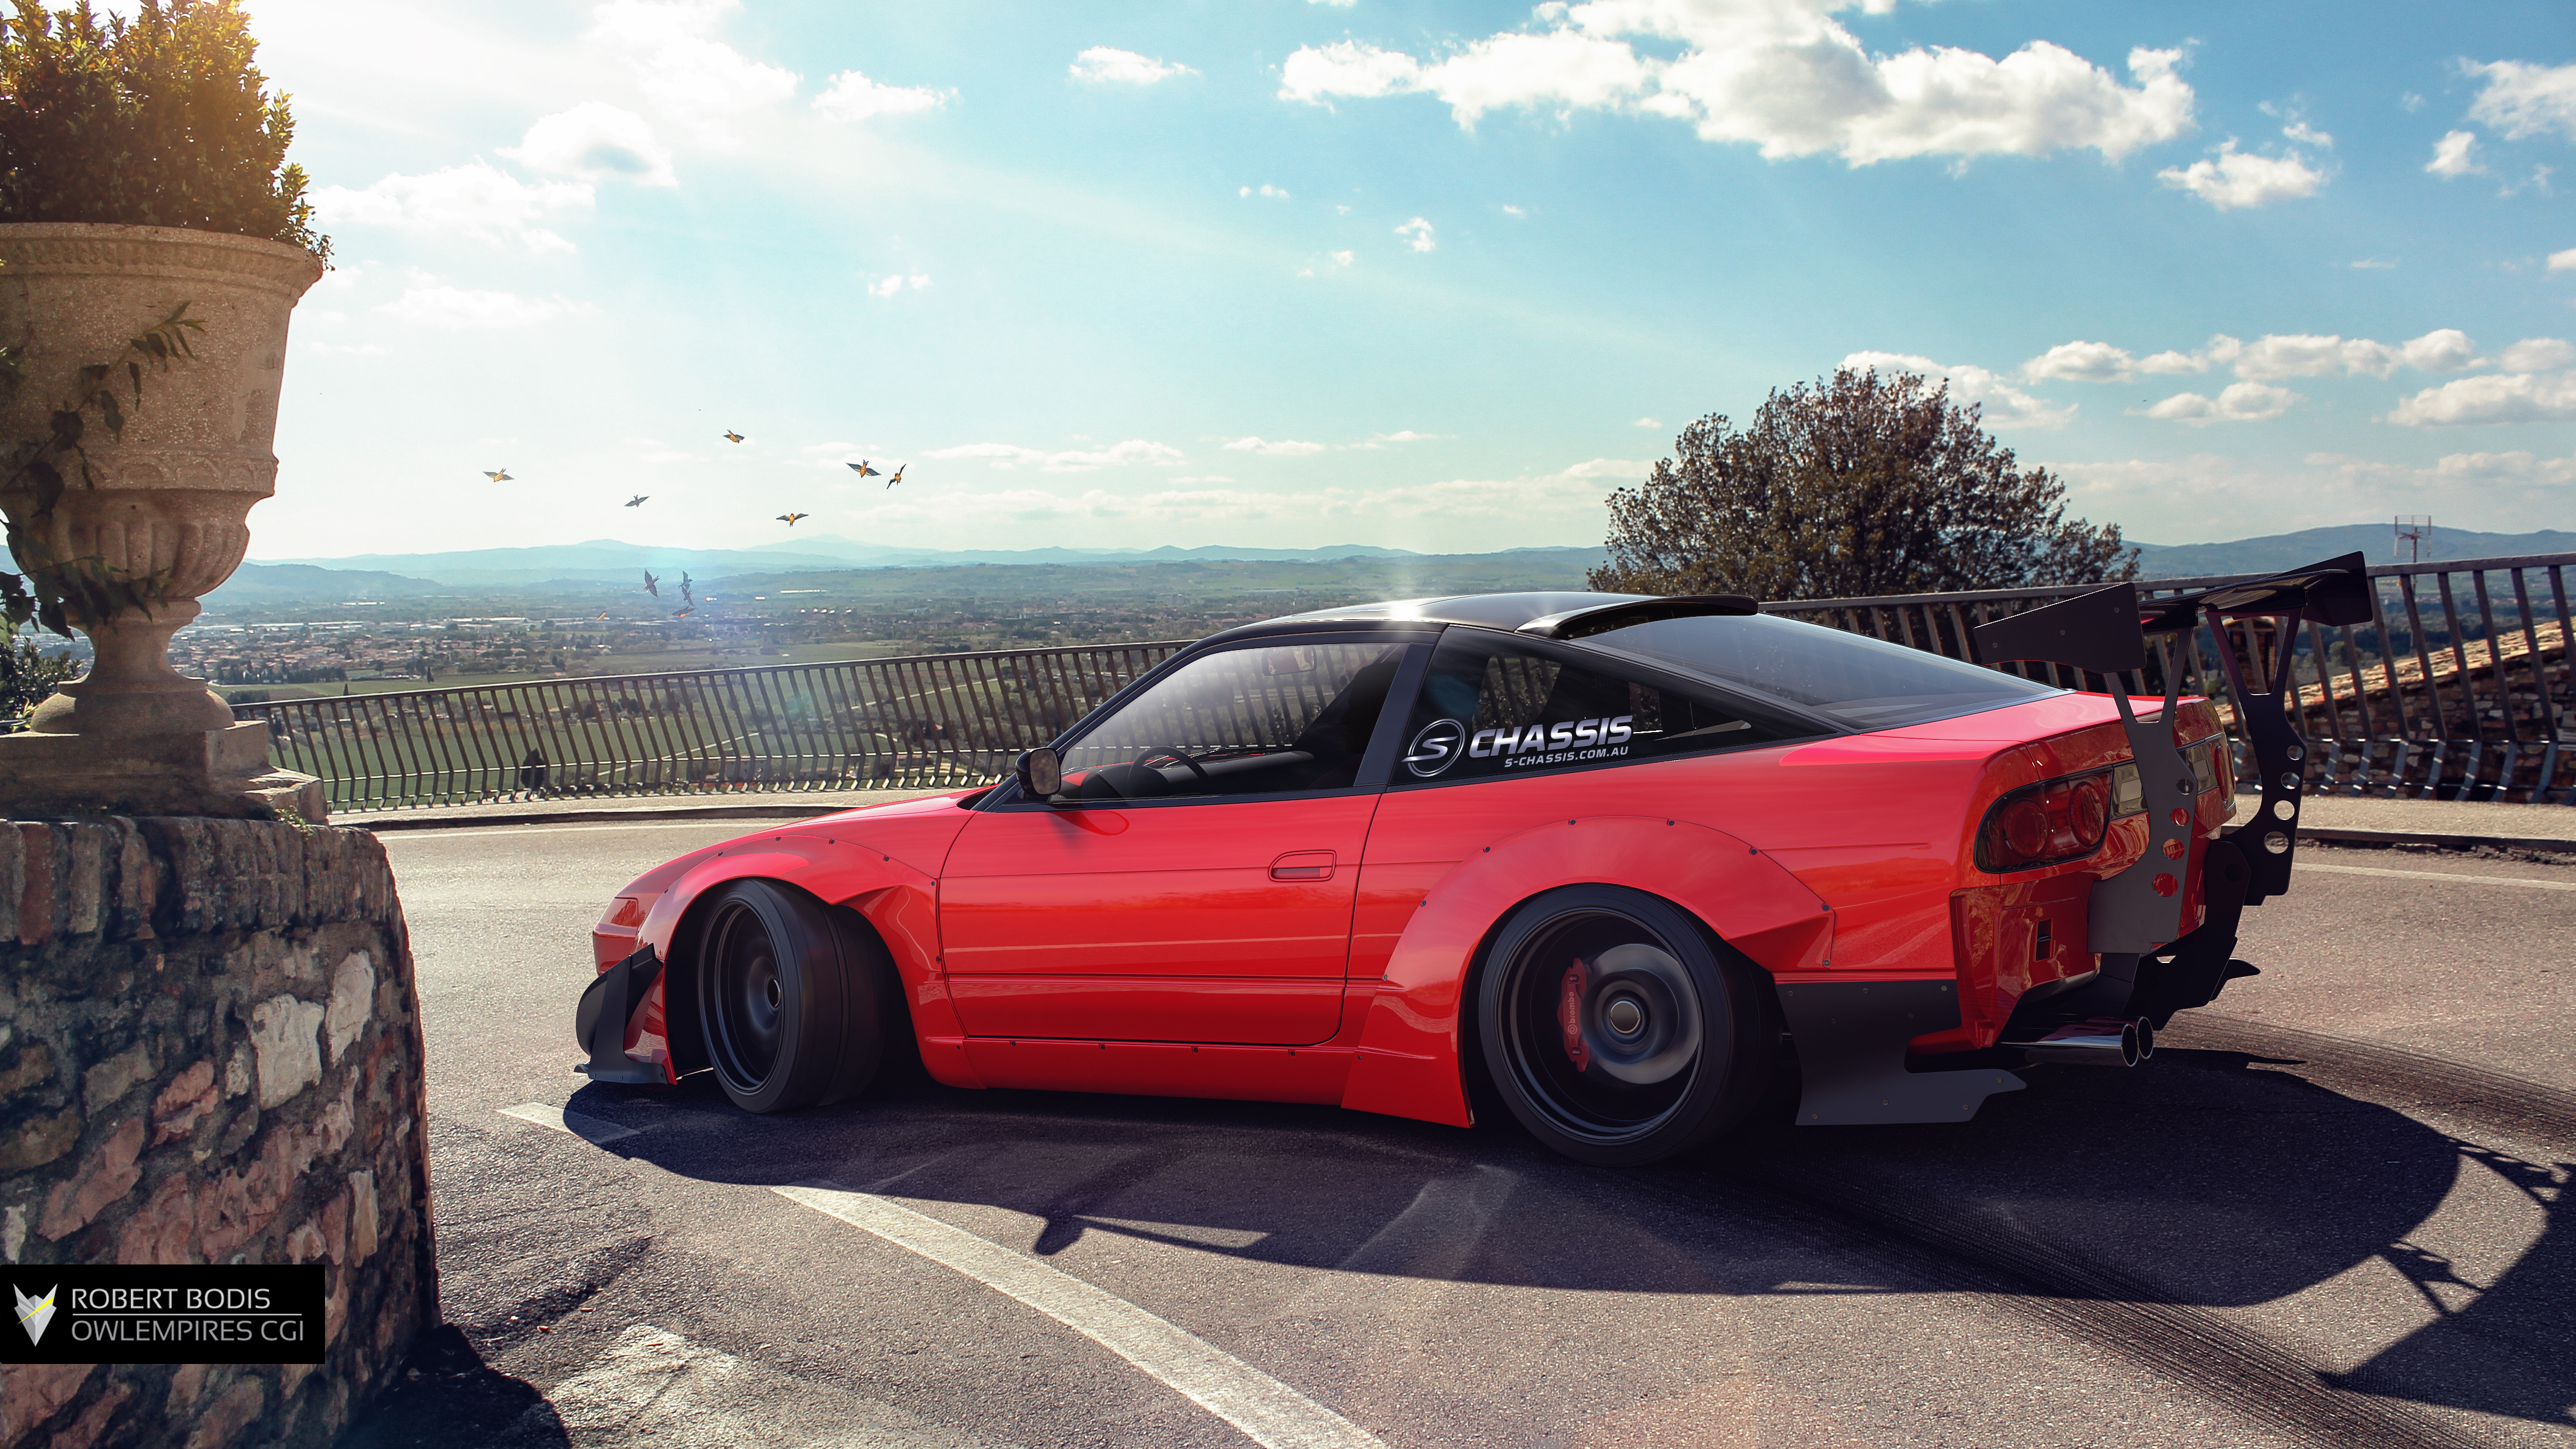
The vehicle model again comes from www.squir.com, with the RocketBunny kit modeled by me. The backplate was shot in Assisi, Italy. Being an iconic location, you will most likely never see such cars passing through there!
I made this render for s-chassis.com.au as a way of saying thanks for every bit of help they have blessed me with! You will find some genuine good-hearted people there. It is always a pleasure to interact or do business with them! Thank you!
Making a walkthrough video on this render is unnecessary at this point as it would cover much the same ground as in the previous videos. However it is a great example for the shadows, so I will talk about that here.
As you know, shadows usually have a barely visible blue tint. The “barely visible” is the important part – when you see people using a black / dark grey gradient when making shadows, these then look a little bit off, and it is as simple as it is missing that slight tint.
If you look at the render, you can see the stone fence on the left is casting a quite dark blue shadow. The easiest way to match that slight tint with Corona is via Corona Sun temperature . As you start to add a cooler temperature to your sun, you will see that the shadows cast on the ground will start to become warmer; the same applies for the opposite, the warmer the sun, the colder the shadow. If it gets so blue it begins to look like a smurf, you went too far!
Shadow sharpness is related to the size of your light source. A small light source will produce sharp shadows, while a big light source will produce soft shadows. Also, shadows will always be darker and sharper close to your objects, then fade and soften out as it they are further away from the casting object.
One thing to note: render engines will have longer render times if using a small light, mainly because you have less photons to bounce around.
In Conclusion
I hope you enjoyed each of the renders, and found the information and walkthroughs about each one educational.
I made this article to try to help out others in the same field – however, I believe it helped me out more! It brought back how awesome it is to be in this business, and how great it is to give something back to the community. It gave me time to write again… something I always loved to do.
I believe each and every one of you will arrive at a point where the projects will just keep coming one after another, and then it is easy to forget how to appreciate the journey to reach that point. There will be speed bumps, extremely long ones, especially at the beginning.
But as long as you are able to endure months, maybe even years, of ‘low water’ and you never lose track of why are you doing this, then there is absolutely no doubt you will achieve your goal one way or another.
Heck, I remember not even so long ago, I had a dry spell in work that lasted around 10 months, and when I finally was offered a big project, I was offered peanuts and had to let it go.
Even more importantly, if you respect yourself and your work, people will respect you. This means letting some projects go by, which is totally okay. Every employer has it’s perfect client where both of them will be on exactly the same page – sometimes that client is you, sometimes it is not, and it is ok to pass-up on jobs where there is not that perfect match.
I’m not saying these because I am in such a great place already…no. I am saying this because hard work and the grind pays up. Every single damn time! No exceptions!
With Great Appreciation,
Robert Bodis
Main website: http://www.owlempires.com/
Facebook Page: https://www.facebook.com/owlempires
Instagram: https://www.instagram.com/owlempires/
Twitter: https://twitter.com/owlempires
Resources
Here is a summary of the resources mentioned in the article; some are free, some aren’t.
Stock photos
www.pexels.com
This is pretty much my only resource for backplates. Every image comes with a CC0 license and they are free.
HDRIs
www.hdri-locations.com
www.hdrihaven.com
www.pg-skies.net
Vehicles
www.squir.com
Speedshape
www.jeffpatton.net/tag/speed-shape
Render engine
www.corona-renderer.com
Advertising
www.s-chassis.com.au
Really nice work putting this all together 🙂 and thank you for the detailed insight! I wish you all the best in future as well!