It’s the time of year to sit by the pool, with a drink in hand beneath the bright sun, and that means you are going to see a lot of a particular feature of light – caustics! Fortunately, Corona Renderer 4 for Cinema 4D is here to let you add those effects into your renders for the ultimate in realism, thanks to the addition of fast and easy caustics.
That’s not all you’ll find in this release though! There’s also the ability to run Interactive Rendering in a docked Cinema 4D viewport, object picking and manipulation within IR (and moving the camera view from in there too), Inside Volume mode for true 3D volumes, Intel AI denoising (for any CPU), correct displacements when stacking materials, the fisheye camera, and more!
NEW FEATURES VIDEO
Get the “too-long-didn’t-read” version of what’s new, in the New Features video:
DOWNLOAD
There’s a lot of reading below, so download and start the installer while you read! You’ll find the latest version at:
https://corona-renderer.com/download/
Demo Refresh: If you have tried a previous version of Corona Renderer and your 45-day trial has expired, then you’ll be pleased to hear that we have automatically refreshed the demo period to give everyone an extra 14 days! Simply download and install Corona Renderer 4 from the link above, and activate the demo license right within Cinema 4D, and then you’ll be creating caustics in no time! Enjoy!
QUICK FACTS
- Caustics – We think these are the best caustics in any render engine!
– Easy to set up with just a click or two
– No complex parameters
– Fast to render
– Handles reflective caustics and refractive caustics
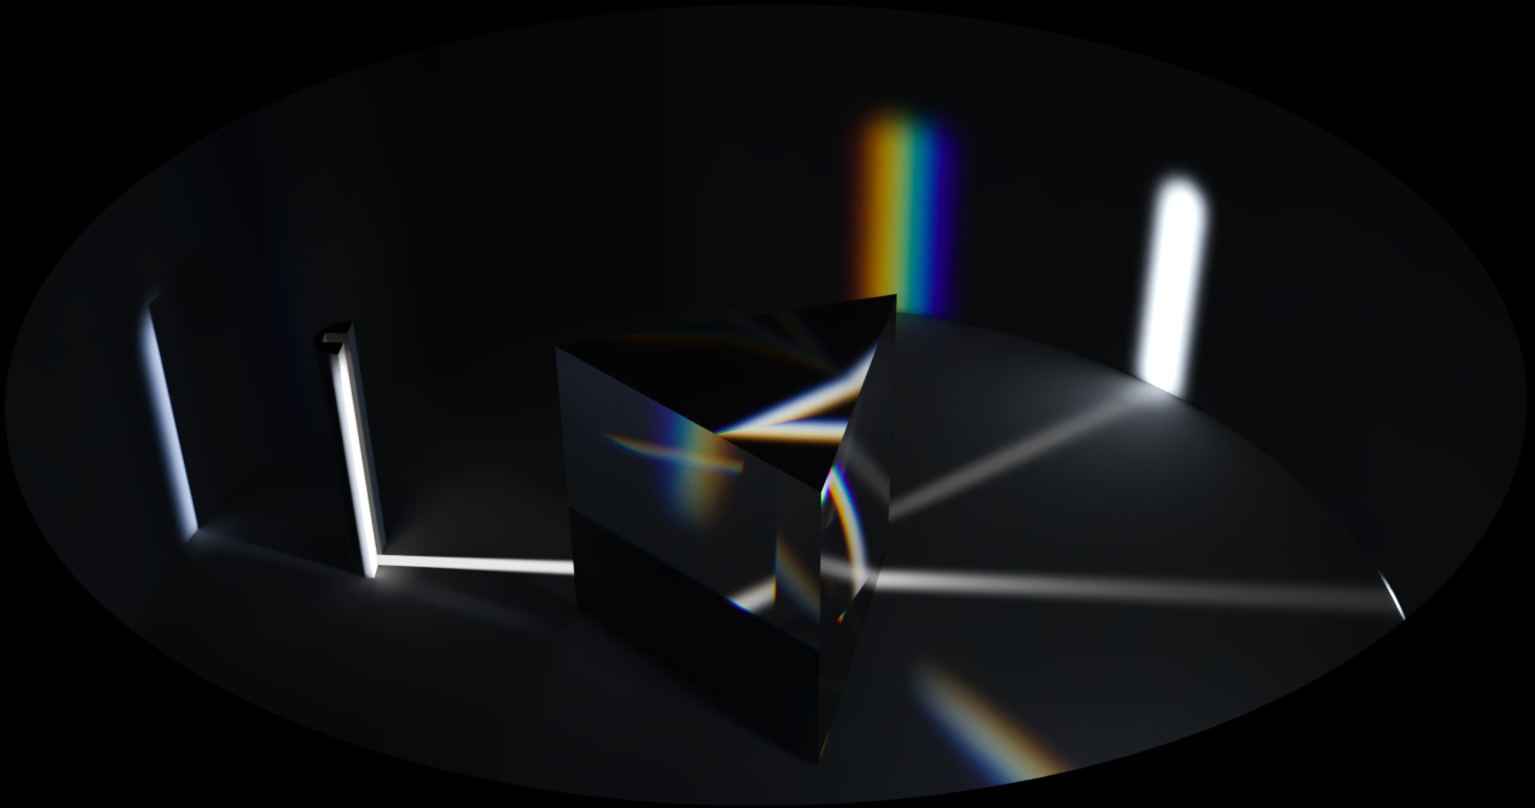
– Refractive caustics can include dispersion (hello Dark Side of the Moon!)
– Each light source (including suns and environments) can have caustics enabled or disabled
– Works as expected with LightMix and other Corona tools - Docked IR Viewport – If you prefer to run IR in a Cinema 4D viewport rather than in the VFB, then this update has what you need!
- Object picking in the render window – in both the docked IR viewport and the VFB, you can now left-click to select objects right in the render. In the docked IR viewport, you can also move, scale and rotate objects there too and you can also use the regular Cinema 4D controls to adjust the perspective or camera view (things that are not possible in the 3ds Max version 😉 )
- Set Depth of Field focus point in the render window – In the VFB render (IR or final), you can right-click to set the point which should be in focus when using Depth of Field.
- Intel AI Denoising – works on any CPU (not just Intel), giving you access to AI denoising for final renders that can be done on any machine.
- Inside Volume mode – for true 3D volumetric materials using the Corona Volume shader.
- Fisheye mode for cameras – perfect for both interior and exterior renders, any Corona camera can be given a fisheye lens, with all the controls you need to get the result you want. This was developed by the Corona for Cinema 4D team, then ported to 3ds Max.
- Stacked displacements – stacking materials on an object now gives the expected results from displacement.
- Multiple Suns for LightMix – now you can set up different times of day in one render, and swap between them in LightMix.
- New Image Filtering – makes noise less noticeable to the eye, getting away from the “pixel-by-pixel” look that CGI noise has. In effect this speeds up rendering, as you will need less passes or time to get to a satisfying visual quality.
- New Light Solver – now fully functional in all cases, the New Light Solver is now enabled by default, and gives great improvements to render times.
…AND MORE!
Full details in just a moment, but first:
COMPANY NEWS
WE ARE STILL EXPANDING!
Just as we never stop improving the software, we never stop growing our team, to handle all the ideas we have for the future of rendering. Please say hello to the newest Coronauts (in totally random order, no favorites here!):
- Viacheslav Kroilov: Cinema 4D Plugin Developer
- Alex Haidu: ARCHICAD Plugin Developer
- Ronan Cailleau: Research Intern
- Stepan Hojdar: Research Intern
- David Vlasák: Administrative Assistant
- Rowan Manns: Quality Assurance specialist
- Matevž Avbelj: Material Library content creator/3D Artist
- Kostadin Petkov: Corona Standalone Senior Developer
Despite all these recent additions to the team, we are still hiring. Right now we are looking for a Product Manager and for developers, so be sure to check out the job openings if you want to be next to join the team.
CORONA RENDERER FOR 3DS MAX
Corona Renderer 4 was released just one week ago for 3ds Max – we like to keep all our users up to date with the latest version as close as possible!
Name Change
The company name is changing from “Render Legion a.s.” to “Chaos Czech a.s.”. Nothing else changes other than the name! Almost no-one knew the company was Render Legion anyway – be honest, you thought Corona was the company name too, didn’t you? 🙂
MAJOR FEATURES
Caustics
Not too long ago, having fast, easy to use GI was the holy grail for render engines. Now that has been achieved, the question is – have we reached the ultimate in realism, or is there some aspect of the real world that is still not fast and easy to create in our renders?
The answer is that renders are missing caustics – sometimes subtle, sometimes bold, they appear in a great many places and we are used to seeing them in the real world, whether that is the classic examples that first spring to mind like water in swimming pools or light through a glass of water, to ones we may not think of such as sun reflecting off a bathroom mirror onto the opposite wall, or sunlight off the body and wheel rims on a car, or from the myriad of windows on a building onto the environment around it.
Corona Renderer 4 aims to change all that, and make caustics easy to add, simple to control, and fast to render.

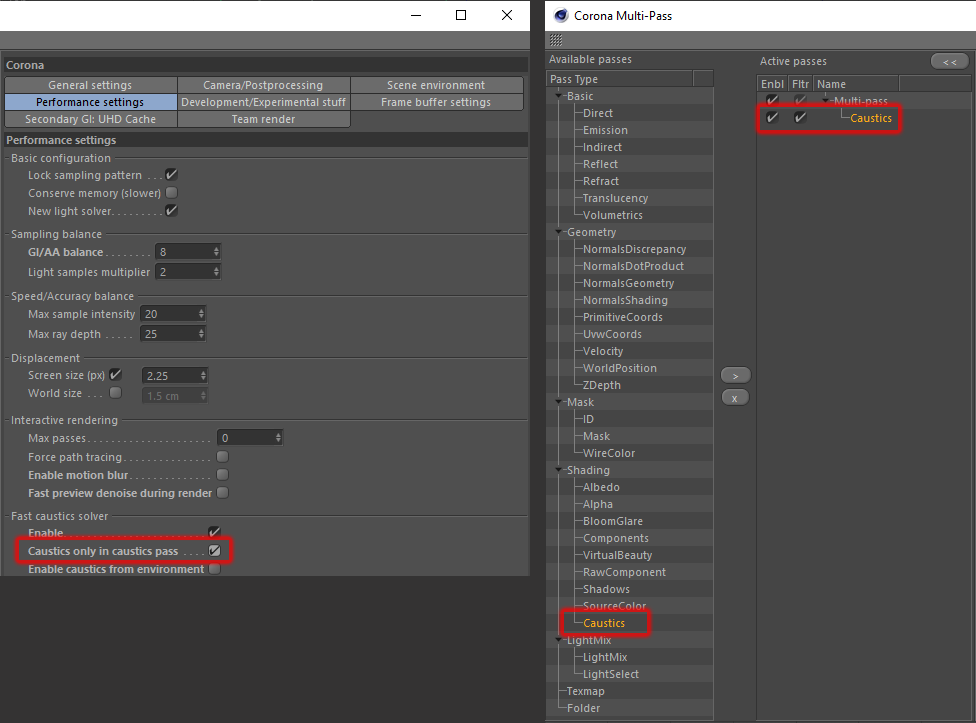
Setup is easy – just enable the new Fast Caustics Solver, and instantly you will get reflective caustics from all materials in your scene. Then for any material with refraction, where you want refractive caustics, just enable the Caustics check box in that material. If you want the caustics to split white light into component colors, just enable the Dispersion effect in that material.
You can then choose to disable particular light sources from affecting caustics, if you want to optimize render speed by keeping the calculations only to those light sources that will have a major effect.
AND THAT’S IT. That’s pretty much a whole tutorial on how to use caustics, in just a couple of paragraphs. You don’t need to know or change any strange and unusual settings, just click on a few checkboxes and you are good to go!

Caustics will respond as expected to both displacement and bump mapping, and will work as expected in LightMix (any color and intensity changes you make to a light source will affect the caustics from that light source).

If you want extra control over the caustics, you can add a Caustics pass in the Corona Multi-Pass, and check “Caustics only in caustics pass”. This will let you composite the Caustics layer in post, so that you can mask it, make it brighter or darker, and so on.
One thing we want to be clear about, just to make sure you don’t get your hopes too high – “fast to render” does not mean renders will take the same amount of time with and without caustics! No matter how efficiently you do extra work, it is extra work, and so will always take longer; that’s true for you, and for Corona Renderer too!
It is highly scene dependent, on many factors, such as:
– Are you using reflective caustics only, or refractive caustics as well?
– Do the refractive caustics include dispersion or not?
– How many materials in the scene have refractive caustics?
– How many light sources have caustics enabled and so are considered in the calculations?
– How much “screen space” the caustics occupy?
– …and so on.
As a very approximate guideline, when including refractive caustics, it may take 2 or 3 times the render time compared to the same scene with caustics disabled
Docked IR Viewport
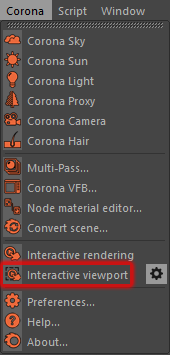
You can now start Corona IR in a docked viewport. To do this, under the Corona dropdown in the Cinema 4D main menu, simply click on “Interactive viewport”:
You’ll also find the settings for the docked IR viewport there by clicking on the cog rather than the text itself, as shown below:
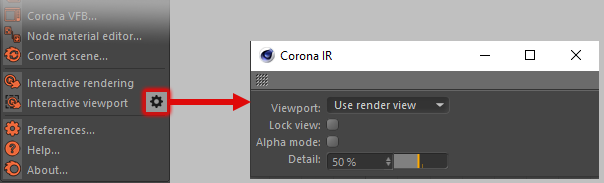
- Viewport – Specifies whether to use viewport marked with “Use as Render View”, or the currently selected viewport, as the source to render from.
- Lock view – Locks which viewport is used as the source for IR to whichever one is active when this is checked (or when viewport IR starts). E.g. if you have “Use selected view” enabled but “Lock View” unchecked, clicking to any viewport will switch IR to the newly selected viewport; if “Lock View” is checked, though, the IR viewport will stay using the current viewport even if another viewport is clicked on.
- Alpha mode – Disables drawing of the image background in the IR viewport; if enabled, then instead of the Sky or HDRI background image, you will see the viewport grid.
- Detail – Scales the resolution of the render in the IR viewport, e.g. the default value of 50% renders at half the resolution of the IR window and then scales it up to fit the window. This is useful for faster previews, though does give a softer or more blurred look to the IR – you can set the Detail to 100% if you want the IR viewport to render at exactly the resolution of the viewport.
Note: Currently the IR viewport doesn’t support changing the render resolution after IR has started; this means that resizing the IR viewport will scale the result of the render, not the resolution of the render; also, it means that changing the Detail value after IR has started won’t have any effect. To change either the render resolution, or the Detail value, simply restart the IR viewport. This should be fixed in a future release.
Object picking (and transforming) and camera/perspective moves in docked IR window
You can left click on any object in the docked IR viewport to select it, and controls such as CTRL+left click for adding to a selection, etc. will all work.
You can also move, scale or rotate the object using the regular Cinema 4D widgets right in the IR viewport too, and the usual controls to navigate the camera or perspective view will work directly in the IR viewport as well.
Object picking and set DOF focus point in VFB
You can left click in the VFB, during IR or a final render, or after a final render, to select that object, and again the CTRL+left click etc. controls will also work here (unlike the docked IR window, you can’t manipulate the objects in the VFB, however).
In the VFB, you can also right click to open a popup and then use that to set the focus point for Depth of Field to that point in the image – if IR is running, it will automatically refresh to use this new DOF focus point; for a final render, either complete or in-progress, you will need to restart it to use the new focus point.
Fisheye Camera
Does exactly what you would expect – adds a Fisheye projection mode to the Corona Camera, which has all the settings you need to fine-tune your results to meet your needs whether you are rendering interiors, exteriors, or anything else!
Intel Open Image Denoiser
The Intel Open Image Denoiser is an AI denoiser that runs on any CPU (despite the name, you don’t have to have an Intel CPU!). It is much faster than the Corona High Quality Denoiser, though not fast enough to use in IR so it is for final rendering only.
Open full size comparison. Scene by Slashcube
As with any AI denoiser, it has some advantages and disadvantages compared to the Corona High Quality denoiser – while significantly faster, it does mean that the AI can generate detail where there was none, and that running it on the same frame twice could produce different results so it may not be recommended for animations.
Correct Displacements with Stacked Materials
When stacking materials on an object, the displacement from each material will now be used, giving the intuitive and expected results.
Previously, only one displacement map was used, taken from the first material tag in the stack, and all other displacement maps were ignored (changes to the offset and tiling of the material tag were respected, but this just resulted in the same displacement map being duplicated with different offsets and tiling).
For example, this new Blend mode makes it easier to overlay labels, decals etc. onto a model, and have both the base material and the label/decal show their respective displacements.
If you use Opacity to blend between the materials, then displacement will be correctly blended also. On opening an existing scene, you will be given the option to keep the previous “First only” mode, or to switch to the new Blend mode (recommended, unless your render has to look exactly the same as before).
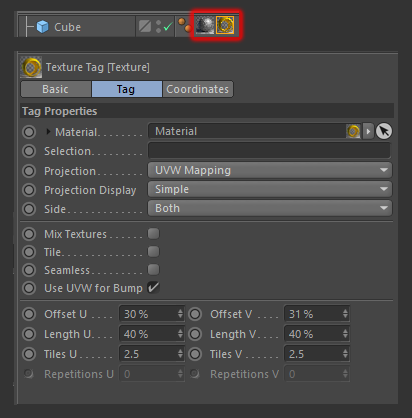
Stacked material tags now use the displacement map from each individual material in the new default Blend mode.
“Inside Volume” mode
Previously, any noise map use in the Absorption, Scatter or Emission channels in the Corona Volume material would only be calculated at the surface of the volume object. Now, with the new “Inside Volume” mode, you can get true 3D volume non-heterogenous materials. That may sound complicated, but all it means is that the noise appears throughout the volume of the object, and not just at the surface.
In the example below, a single Corona Volume material with noise in the Absorption channel gives the expected result with the new “Inside Mode”. Previously, the On Surface mode gave very unsatisfactory results with global Volume materials, as shown; you would have had to resort to creating geometry to apply the Volume material to, and even then the noise would only have taken effect on the surface of that object and not throughout its volume.
The new “Inside Volume mode gives a true 3D volume, compared to the old “On Surface” mode. Scene by Slashcube
If you need the Corona Volume material to work as it did before, simply use the “On Surface” mode.
The volume materials can appear solid, as well as like mist and smoke
Multiple Suns for LightMix
This new functionality lets you set up and use multiple Corona Suns, letting you use LightMix for more extreme changes such as going from day to night, all in one render. With multiple suns, you can now position them at the appropriate angle for the time of day (simply changing the color of one sun was not going to make it look like a realistic evening set up while the sun was still overhead like noon!)
One thing to note, to use this new functionality you will need to disable the New Light Solver. Basically, you trade the speed boost of the New Light Solver for the extra freedom to have multiple light set ups in just one render. Also, with the multiple suns active, your Beauty pass will likely not be usable, but that’s ok as the functionality is intended for LightMix!
High Quality image sample filtering
The way noise looks in a render is often the biggest giveaway that it is a CG image. It has a particular, harsh look, varying pixel by pixel, so it is very obvious to the eye. The new High Quality Image Filtering option “smooths out” the noise, making it less harsh and obvious, so that you can use less passes to reach a visually acceptable level of noise (especially when followed by the Corona High Quality denoiser).
Note: Neither of the AI denoisers will work with the new filtering, so it is automatically turned off if either of those is selected. As with all things AI, the software has been “trained” on particular examples of “noisy version of the image vs. clean version of the image” and that training has been with the old, harsh type of noise. We are working with Intel to have their AI denoiser retrained to work with our High Quality Image Filtering, so hopefully that restriction will be removed in the future!
New Light Solver
The New Light Solver has been in Corona Renderer for the last few versions, and now the last polish has been done to it, it is the default solver going forward. It gives significant improvements in render speed, particularly where there are lots of light sources, or lots of objects occluding light sources. A checkbox has been added to the Performance Settings tab of the Render Settings to let you disable it if you need to reproduce a render exactly by using the previous light solver.
Note: It is recommended to always use this new light solver, and only when wanting to take advantage of multiple suns in LightMix might you want to disable it.
SMALLER IMPROVEMENTS
VFB Improvements
- Checkbox for enabling/disabling denoising (in the VFB and CIE)
This is useful for quickly comparing the denoised and non-denoised image, usually when checking whether denoising has blurred any details too much. It is enabled by default (if denoising is turned on, that is!). It works only in regular rendering, so it does not work in interactive rendering. Note that denoising will be calculated when selected, whether this checkbox is on or off – the checkbox only controls the result you are viewing in the VFB.
- By default, images stored in render history are now displayed with their original postprocessing parameters instead of using the current VFB parameters, so the render history can be used to compare different versions of tone mapping, denoising etc. A checkbox allows you to enable the previous functionality where all history renders are displayed using the current post-processing settings and not the settings in use when they were saved.
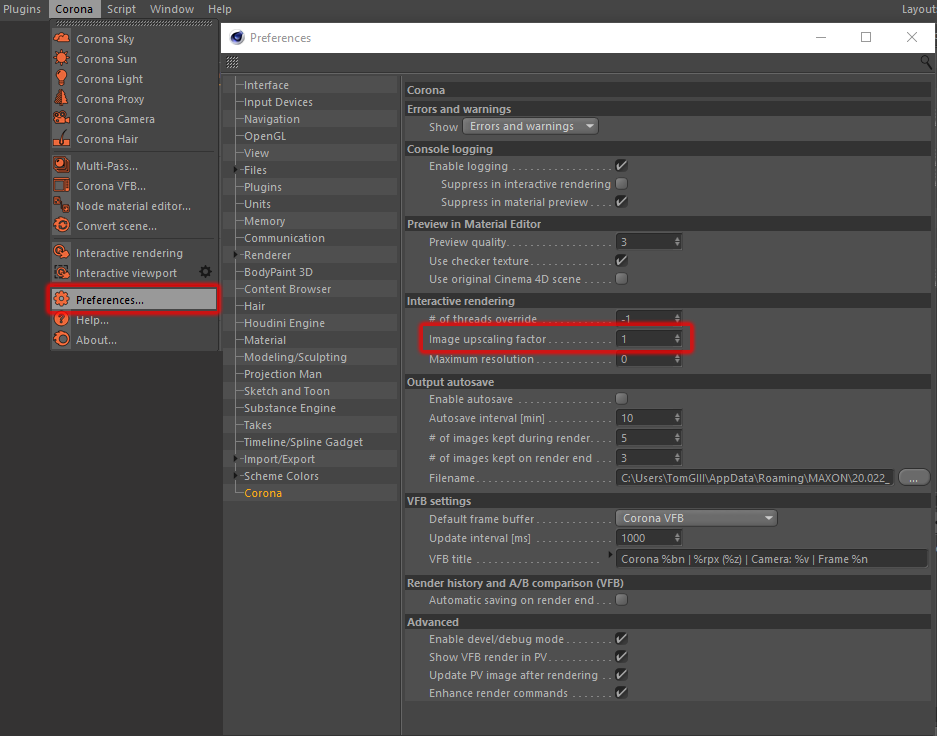
- New spinner added that lets you upscale an image rendered in IR. Located in the Global Preferences, it will render at a lower resolution than the VFB then upscale the image to fit – for example, with an upscaling of 2, it will render at half the size of the VFB then upscale the image to fit the VFB. This may be useful on High-DPI displays.
- Added green-magenta tint to the VFB and the Corona Camera Tag. This is a common adjustment in photo-processing apps, and it allows full adjustment of the white balance.
Reworked the VFB render region UI:
- The region button is now sticky. This is a first step in transforming VFB to using separate function modes. VFB stays in this mode until you deselect the region button or select a different mode (e.g. Pick mode).
- Regions are now editable only in the region mode and in this mode the regions are drawn thicker for easier adjustment, and when not in edit mode they are drawn thinner to make them less obtrusive.
- When multiple fuzzy regions overlap, only the outline is drawn now (fuzzy regions are where the outside of the render region is “feathered and blended” into the original render, represented by a green area around the render region – you can draw these by holding CTRL and click-and-dragging at the edge of a region).
- Regions are now drawn half-transparent outside of the region edit mode.
Team Render improvements
- Team Render clients can now obtain a license from the license server after the TR client startup – This means that the license server can safely be started after starting the clients, as well as before.
- Team Render clients now search for the license server on all network interfaces –so if any of your computers has multiple network interfaces installed, the license server can be found on any of those interfaces.
- Experimental arbitrated mode for Team Render – It is recommended to enable this mode, as it should prevent (or greatly reduce) clients “dropping out” due to the network being overloaded with data being sent between clients and server.
General smaller improvements
- Removed “Render perfect” checkbox from Corona light – a perfect sphere is now always used for any spherical light with uniform scale. When this was not enabled, the benefits of the perfect sphere were lost which can result in longer render times. This would mean any older scenes where this was disabled may render more quickly, particularly where many Corona sphere lights were used.
- Added a checkbox for turning on memory optimizations of geometry, in the Performance Settings tab of the Render Settings. Note that this option was previously in the Development/Experimental section as the “LowMem” option, and the functionality remains the same – it will reduce memory requirements by 5 to 10%, but at the cost of rendering being 5 to 10% slower (which is better than the speed loss from running out of RAM altogether).
- Changed how color of Corona light instances is resolved.
- All Corona materials can now be used on hair object.
- When a standard Corona material with Emission enabled is used for the environment, the Emission channel is always used even if the Emission color is set to black.
- Error logging has been added when an IES profile fails to load (console).
UI IMPROVEMENTS
- Corona Node Material Editor supports [1] and [2] modifiers for mouse navigation.
- Clicking on a VFB history item name preselects the entire text – this makes it easier to overwrite the history item name.
BUG FIXES
VFB Bug Fixes
- Fixed the “enabled/disabled” state of the VFB start/stop buttons in IR.
- Fixed loading of LightMix configuration file in the VFB.
- Fixed LightMix resetting with each IR update.
- Denoising amount status and information text in the VFB is now correctly shown in Interactive Rendering.
- Fixed being able to create a new region while VFB regions are disabled (which resulted in deleting all existing regions).
- Fixed occasional crashes occurring when editing a region in the VFB after IR update.
- Fixed occasional crashes occurring when rendering a second render which had a different resolution than the first one while the VFB is open.
IR Bug Fixes
- Post processing parameters are no longer reset on Interactive Rendering start.
- Fixed resetting of post processing when switching the active camera in IR.
- Fixed crash occurring when stopping IR in some scenes containing position-based volumetric shaders.
- Fixed updating of “Fast preview denoise during render” in IR.
- Fixed an issue with render instances in IR, which caused a crash sometimes.
- Fixed updates of spherical Corona lights in IR.
- Fixed settings updates in IR.
Team Render Bug Fixes
- Fixed looping Team Render client when rendering without license.
- Fixed missing Corona proxy in Team Render.
Shader/Material Bug Fixes
- Fixed crashes in Cinema 4D R20 when using volumes on Mac OS X.
- Fixed crash when a shader in the material overrides needed to access mapping data.
- Fixed crash when displacement was applied to meshes containing three co-adjacent triangles.
- Fixed problem causing 100% usage of one core in Corona node material editor in Cinema 4D R20.
- Fixed problems with layering materials over material with refraction (e.g. glass).
- Fixed problem with displacement from material override always used on objects with Layered material even when explicitly ignored by include/exclude list.
- Fixed NaNs in some cases when rendering the Skin material.
- Fixed UI freezes when using a Corona Bitmap with large textures.
- Fixed occasional hangs when the material preview is being updated.
General Bug Fixes
- Fixed crash when rendering is stopped early.
- Fixed loading of light color from some older scenes.
- Fixed random NaNs appearing in tonemapping pipeline.
- Fixed Corona lights with black colors not rendering.
- Fixed hair inconsistencies in animations.
- Fixed multiple crashes caused by docked Multi-pass Manager.
- Fixed problem with the Multi-pass “enabled/disabled” state being occasionally inconsistent with C4D.
- Fixed “Visible in masks” in the Corona Compositing tag.
- Fixed incorrectly displayed default value of the “Recursive” checkbox in the Mask channel in Multi-pass.
WHAT’S AHEAD
As with every release, now that Corona Renderer 4 is out, we are already at work on the next version! You can keep an eye on plans for the core in the 3ds Max roadmap, and see what we are cooking up for you specifically in our C4D roadmap.
DOWNLOAD CORONA RENDERER 4
Whew, it’s a long way back to the top of the article! To save wear and tear on your mouse, here’s that download link again:
https://corona-renderer.com/download/
Thanks!
Caustics are probably the last big element missing for true realism in today’s renderers, and it has taken a lot of research and a lot of coding and hard work to figure those out, and then get them working quickly, and easily, but we think it has been worth it. Once again, it puts Corona Renderer ahead of the pack in terms of realism, all with its known ease-of-use.
We’d like to thank you for traveling along with us on this journey to the future of rendering – your tests and experiments with new features help us fix and refine them; your feedback on features and tools guide us on what we should work on next; and your love for Corona and the wonderful work you create using it is why we do what we do.
So our thanks go out to our devs, support, business partners, forum moderators, translators, beta testers, advisors, partners, resellers, our friends at other Chaos Group offices around the world, and of course to you, our users, for keeping Corona Renderer constantly growing and improving!
Thank you!
Adam, Ondra, and the Corona Crew
Congratulations on the new version 4, but the “Pic Color from screen” tool is not working. she is very helpful. In the same way that replaces the 3dmax by the 4d cinema I replace the Vray by the Corona, and I am very happy. Much success for all involved.
Hi! Please report all bugs and problems either over on the forums, or by ticket – unfortunately, developers and support can’t monitor comments on the blog. See https://help.c4d.corona-renderer.com/support/solutions/articles/12000033461-how-to-report-issues- for how to get in touch with us about any problems, and we’ll be happy to look into them!
And thank you for the congratulations 🙂 We hope you enjoy the new release!
Hi! Could you explain how do I set multiple environments in cinema 4D? In 3ds Max seems way easier. I can’t find any tutorial on that subject… Thanks
Well, multiple environments followed on in 5 and 6 with improvements. There is no tutorial yet, but one is on the way 🙂 Meantime, it’s as simple as adding multiple Corona Sky objects, now either procedural or with HDRIs, and creating one LightSelect element for each sky (adding the Sky in to the LightSelect element). Tutorials on LightMix in general (that will include using multiple environments), and the new Sun and Sky system, will be coming in the next few months, so keep an eye on our YouTube channel for that (https://www.youtube.com/coronarenderer), and meantime for specific questions or help on achieving effects, the forum would be the best place to post (https://forum.corona-renderer.com/index.php?board=49.0). Thanks!