It’s time to start 2019 with a bang! We’re pleased to announce the release of Corona Renderer 3 for Cinema 4D! This brings all the power of the renowned Corona Renderer engine to Cinema 4D users.
In this article, we’ll give you a run through of the major features that set Corona Renderer apart from other render engines – we look forward to welcoming a whole new team of Coronauts to the family!
FEATURES OVERVIEW VIDEO
If you don’t have time to read the (lengthy!) blog article in full, this video will give you a quick taste of what Corona Renderer 3 for Cinema 4D offers:
Read full details about Corona Renderer 3 for Cinema 4D and download it now!
DOWNLOAD
If you want to get straight to the download, you will find the latest version at:
https://corona-renderer.com/download/
Feature List
Make yourself a cup of coffee, or tea, or grab a beer – this section lists all the major features of Corona Renderer 3 for Cinema 4D, focusing on what makes it different from other render engines – and that makes for one LONG article!
Interactive Rendering
Say goodbye to test renders thanks to Interactive Rendering (IR). Now you can get near-instant feedback on how your image will look, while you adjust lighting, materials, objects, and in fact anything in the scene.
Denoising
Save up to 70% on your render times by using Denoising! This removes the need to wait for the render engine to clean up noise by calculating extra passes, and instead denoising intelligently detects and cleans up remaining noise. The example below shows the difference between a fully denoised image and one with no denoising, both rendered for 30 passes:
Denoising comes in two flavors. The first is High Quality denoising, which runs on the CPU, gives reliable and high quality results, but can take longer to run and can only be used on final renders.
The second type is NVIDIA GPU denoising, which runs on the GPU (compatible NVIDIA GPU required), can be much faster than High Quality but may introduce more blurring or artifacts, and can be used for Interactive Rendering as well as final renders.
When using denoising for a final render, you can blend between the raw render and the denoised version, to find just the right balance between cleaning up noise while preserving detail.
LightMix
The Interactive LightMix lets you adjust color and intensity of light sources during or after rendering. This is ideal for making subtle adjustments to the warmth, color or brightness of Corona Lights or light emitting materials, and can also be used for more extreme changes like turning day into night, all without re-rendering!

As well as handling Corona Lights and materials that emit light, it also works with the Corona Sun and with environment lighting from Corona Sky or HDRI images, so that you can control all aspects of lighting without having to re-render.

Denoising can be applied to each LightSelect pass individually, and by enabling it for all LightSelect passes, your final LightMix pass will be denoised in full as shown in the example above.
Corona Node Material Editor
Cinema 4D R20 introduced its own node materials, but these serve a different purpose than the Corona Node Material Editor (or Node Editor for short). While the native C4D node materials are a unique type of material, the Corona Node Editor is a global or world view of all your materials, letting you work with almost any materials whether they are Corona materials or not (note that the Cinema 4D node materials introduced in R20 do not work with the Corona Node Material Editor at this time, as there is no API for those in Cinema 4D yet).
Here’s a detailed look at the features:
It is a global or world view of materials
Our Node Material Editor is a way to view any of your scene materials – as many as you like at once – and then create or edit them using visual nodes, which greatly simplifies material creation.
You can use views to organize your materials
You can create as many views as you like, for example one view may contain all the wood materials, another all the metal materials, and so on – although how you use views is entirely up to you!
It can handle almost any sort of material
You don’t need to create a special material to use the Corona Node Material Editor. This means that any existing materials can simply be dropped into it, to take advantage of this visual way of working with them.
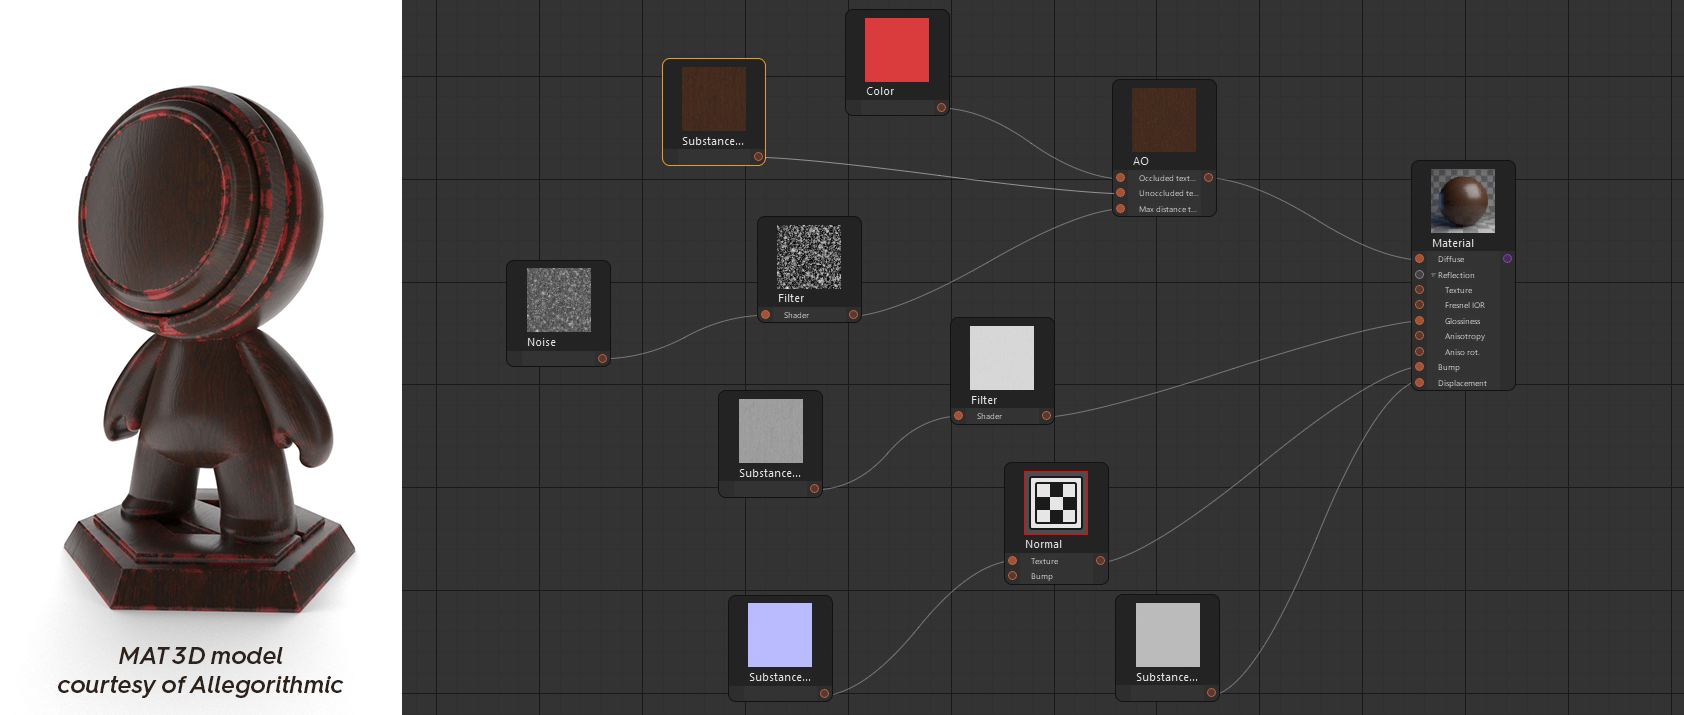
It also works with native Cinema 4D materials and shaders, Substance shaders, etc.
You can connect one shader to any number of channels, or any number of materials
Natively in Cinema 4D, if you attach a Noise map to the Diffuse for example, then want to add the same Noise map to the Bump, you end up with two separate Noise maps and have to edit or adjust both whenever you want to change them.
The same applied if you wanted to connect a shader to more than one material – you would end up with separate copies of the shader, and would have to modify the parameters in two (or more) places to keep things matching.

Using the Corona Node Material Editor, you can now connect one shader to as many channels – and to as many materials – as you like; change that one shader, and you affect all the channels and materials it is connected to (behind the scenes, this is done using a new Corona Shared shader, but you never need to know or think about that and can just draw your connections to hook up your shaders any way you like!)
It works with the native Layer shader
The native Layer shader is a bit of a different animal from most shaders – for one thing, the number of connections to it can change depending on how many layers you want, and its UI changes accordingly too.
It took some clever work, but we have the native Layer shader working perfectly in the Corona Node Material Editor, including being able to use Folders!
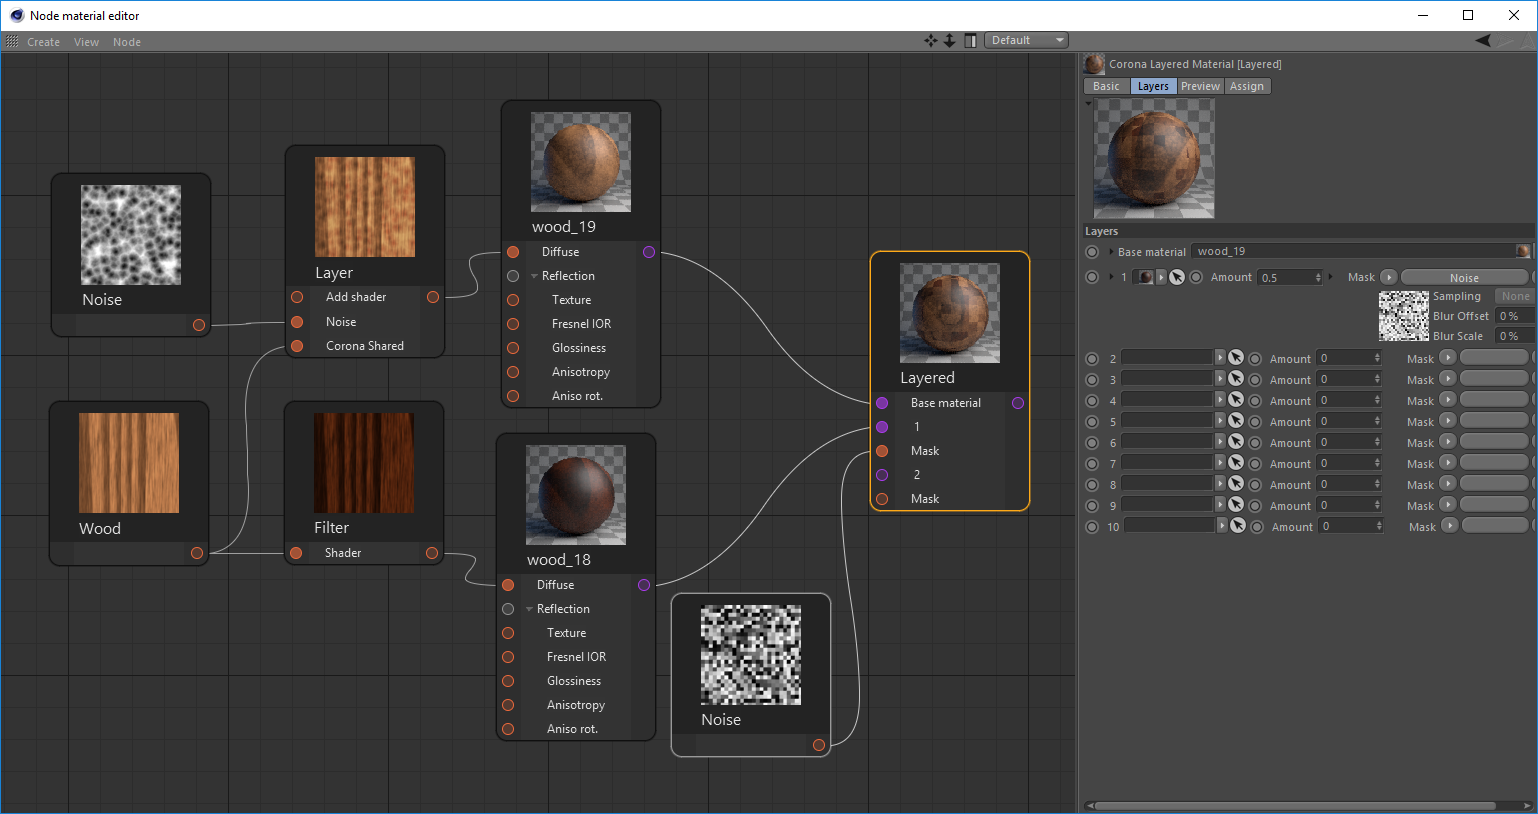
And you can use the native Layered material too – and mix and match all this functionality in any way you want.
You can edit in the Corona Node Material Editor, or in the native C4D material editors
You can swap back and forth between how and where you edit your materials, without having to worry. It’s up to you how you want to work with your materials!
Lots of functionality to ensure ease of use
As you’d expect from Corona Renderer, there are lots of features to make sure your workflow runs smoothly, such as auto-sorting of the node layout, select by selection box, CTRL + Drag to copy the selected nodes, and more.
It is not dependent on which version of Cinema 4D you are running
Since the Corona Node Material Editor is part of Corona Renderer, it will run in any version of Cinema 4D that is supported by Corona Renderer (R19, R18, etc.)
Integration
Corona Renderer is an external render engine, but we’ve made sure it’s so closely integrated with Cinema 4D that you’ll soon forget that and view it just the same as the internal render engines.
You can render to the viewport, render to the native Picture Viewer, render to the Corona VFB – it’s all the same to Corona. The native Picture Viewer also has access to all the post-processing options found in the Corona VFB, and the PV and VFB stay in sync whichever one you use to adjust a setting.
Lights
Note – the sample images in this section all use the free Paris Apartment scene from Slashcube.
Sun and Sky
The Corona Sun and Corona Sky work together to give an easy to use realistic lighting system. How high the sun is in the sky will automatically adjust the color of the sun and the sky, and the sun will always generate soft shadows since it is physically realistic (though you can adjust the size of the sun to sharpen or soften the shadows further if you prefer).

HDRI
You can use an HDRI to illuminate your scene by using the Corona Light material applied to a Cinema 4D sky.
Corona Lights
An all-purpose, flexible light that lets you create any light source in your scene. It can be set to be an area light using a circle or rectangle, or an object such as a sphere, cube or cylinder, or a sector from sphere.
Directionality lets you control how focused the light is, or alternatively you can load an IES profile to determine the shape of the light distribution. Some examples of the Corona Light settings are shown below:

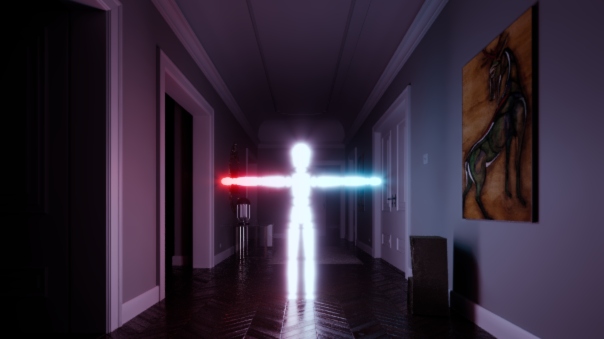
Corona Light Material
You can apply this material to any object to turn it into a light emitter. Add a touch of bloom and glare and the standard Cinema 4D character becomes a visitor from beyond!
Cinema 4D Native Lights
Corona Renderer works with most Cinema 4D native lights, including spotlights, without any need for conversion. Corona Renderer even supports some of the non-physical parameters in the native Cinema 4D lights, such as Shadow Color. We have a helpdesk article that explores more about support for native Cinema 4D lights.
Materials
Corona Material
The Corona Material is a universal material with which you can easily create almost any material.
Some specific parameters in the material are called out below as examples:
Dispersion
Dispersion is where light of different wavelengths is refracted by different amounts through a material. It is ideal for creating realistic glass or gemstones:
Subsurface Scattering
You can use a standard Corona Material to create materials where light penetrates the surface and bounces around inside the material before exiting again – called Subsurface Scattering, this effect is needed for realistic milk, wax, marble, orange juice, fruit, and more.
(Free dragon object from TurboSquid)
Corona Volume Material
The Corona Volume Material is ideal for fog, mist, and other materials that have no actual surface properties (the regular Corona Material has volumetric parameters for materials that have both volumetric properties and surface properties).
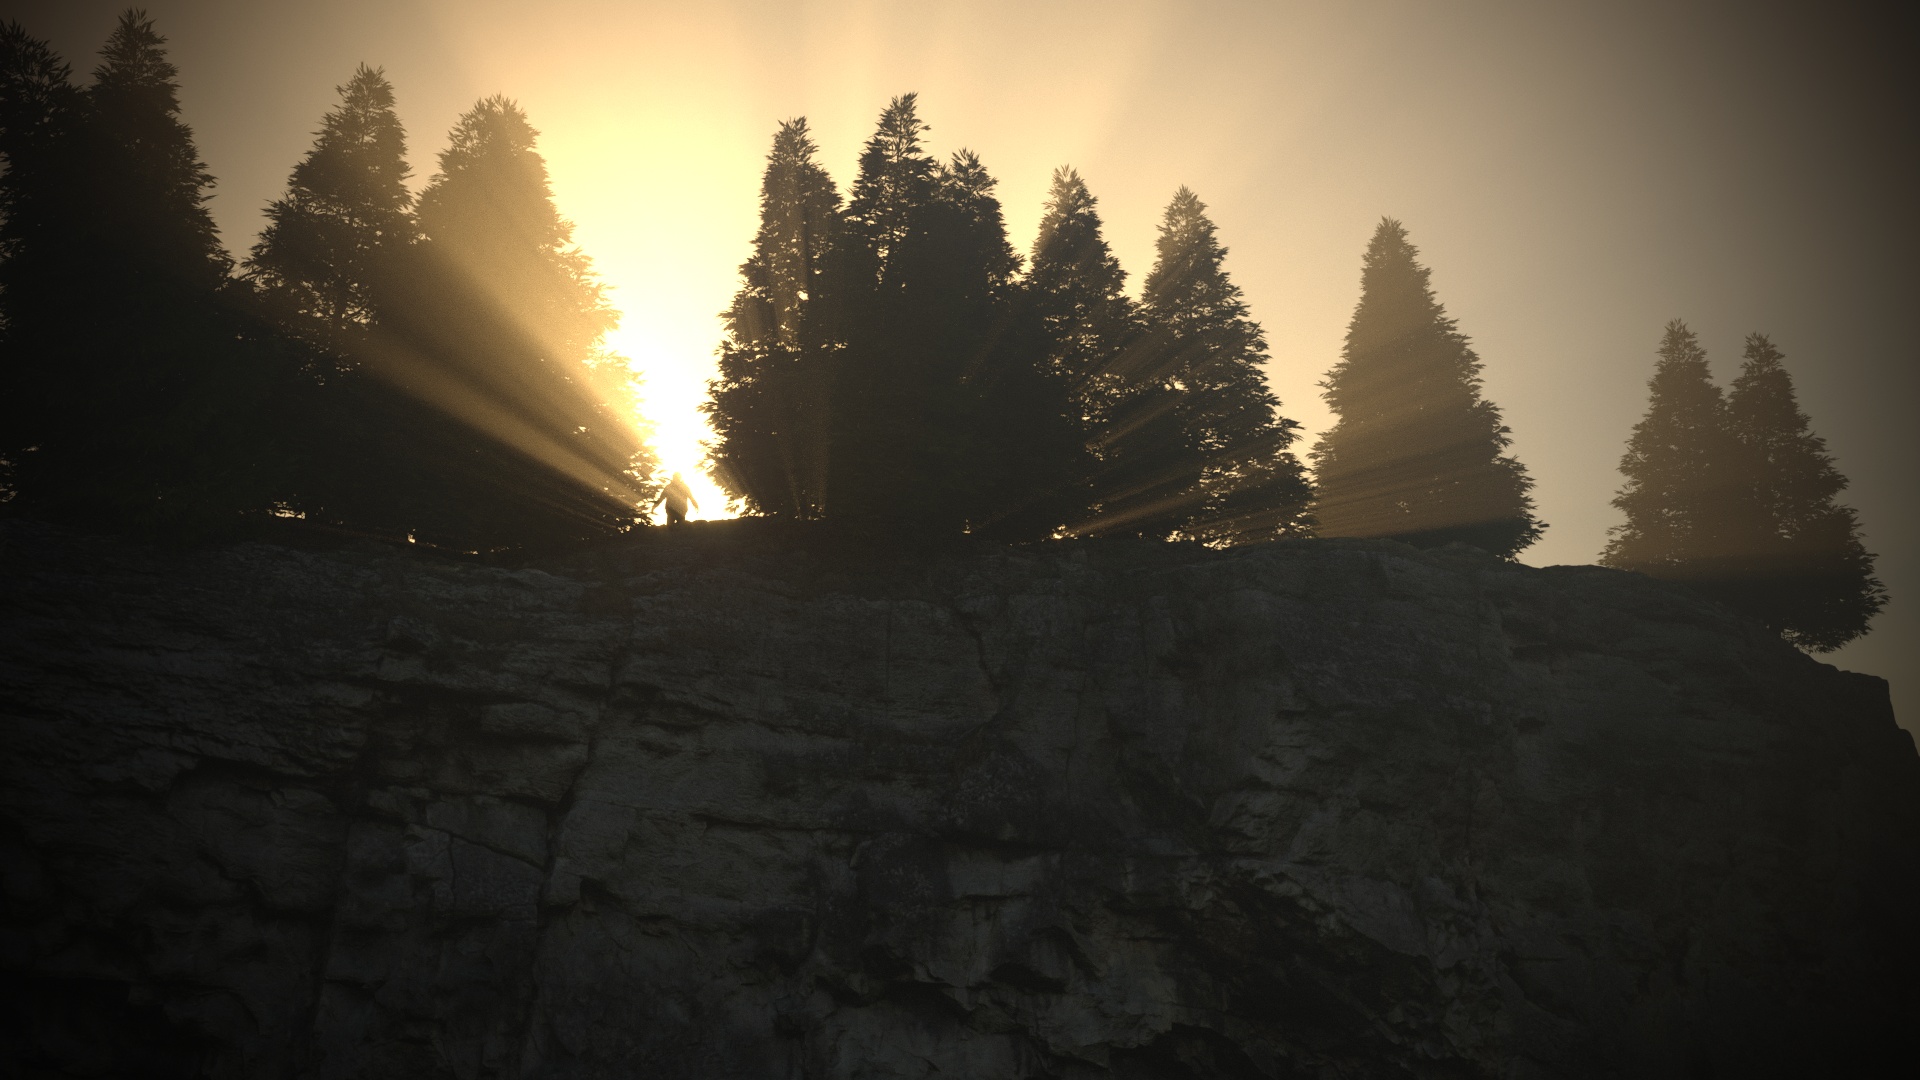
Cliff model by 3dhdscan, under Creative Commons Attribution 4.0 International (CC BY 4.0) license.
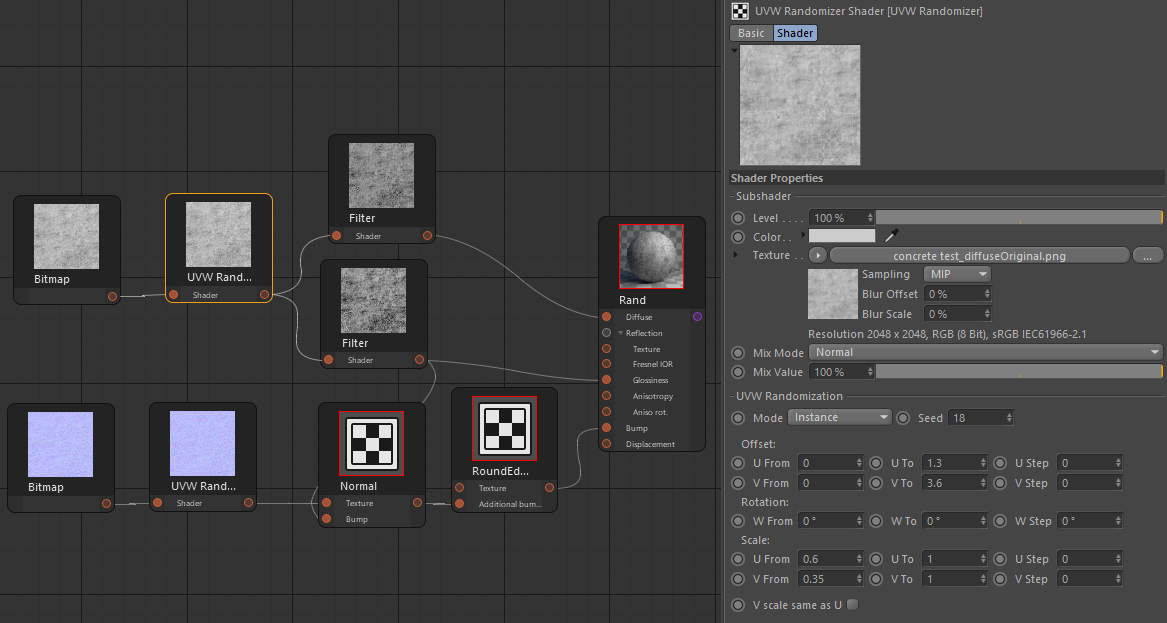
UVW Randomizer
This allows applying a random offset / rotation / scale to textures and maps applied to different objects. You can use this to vary the look of one wood texture applied to many planks, for example, so that there is no obvious repetition in the scene.
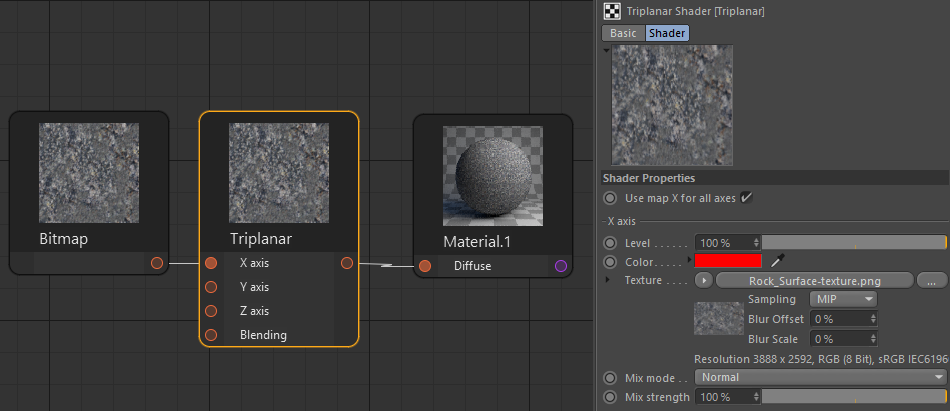
Triplanar
The Triplanar map is useful for applying textures to objects without having to explicitly unwrap their UVs. It prevents visible seams by introducing blending between the applied maps, and it does not produce stretching, which is characteristic to standard planar mapping.
In the image below, this free model by Rigsters was downloaded from Sketchfab. On import, as expected it has no UV mapping, and applying a bitmap gives a solid color. Applying a simple default UV tag does not help, as it gives a distorted texture. Rather than come up with a good UV unwrap for the object, all we need to do is apply the Corona Triplanar map (without ever needing to apply a UV Tag at all):

Hair and Skin
Both hair and skin are complex materials to render, with many unique properties that can’t be covered adequately in an all-purpose shader, which is why Corona has dedicated shaders for them.
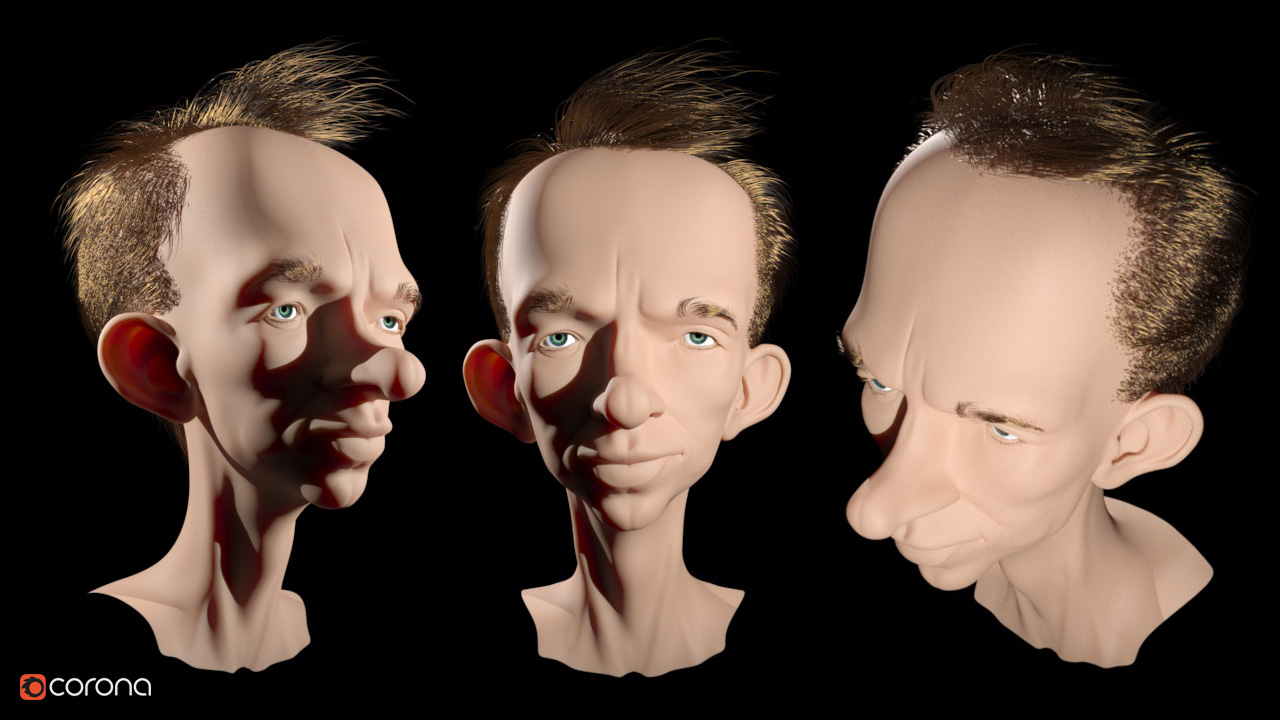
‘Henry’ character from Cinema 4D Studio Content Browser, by Bunk Timmer.
Both the Hair and Skin shaders give great results, render quickly, and are easy to use even if you have never tackled these materials before.
The Corona Skin shader can simply be applied to any object. For the Corona Hair shader, you have several options:
- Use the native Cinema 4D Hair material and apply the Corona Hair material to it. This is the recommended approach – the native hair material will control the structure (bend, curl, twist, etc.) while the Corona Hair material will control the overall appearance and color with full access to the parameters there. The Cinema 4D hair material does not need to be set to generate geometry.
- Use only the native Cinema 4D Hair material. Corona Renderer will implicitly convert the material properties to Corona Hair and render accordingly (this means it may look different than rendering natively in Cinema 4D, which does not use PBR materials for its hair material – you also won’t have access to the specific parameters in the Corona Hair material to tweak them just as you want).
- Use only the Corona Hair material, applied to some geometry. This can be done with geometry from any source, but then you do not have ongoing parametric control of things like bend, curl, twist etc.
Color Correct
This map lets you adjust Brightness, Contrast, Saturation etc. for any input map.
Tonemap Control
This is used to remove a map from being processed by tone mapping, for example when you have a backplate that you don’t want to be affected by Exposure, LUTs, and other post-processing adjustments.
Native Cinema 4D Shaders
Corona Renderer will implicitly convert most native Cinema 4D shaders, and render them as expected in most cases.
Because of this, some Corona shaders have not been ported from 3ds Max because Cinema 4D already has native shaders that perform the same role and Corona Renderer works with these shaders. For example, there is Variation shader for randomizing textures by object or material ID (so there is no need for the Corona MultiMap shader), and the Layer shader (so there is no need for the Corona Layered shader).
Scene Converter
Note that native Cinema 4D shaders are not PBR-based, so some aspects of the materials may not render exactly as they do in a native Cinema 4D render engine – e.g. chrome materials may have too much Diffuse and not a high enough Reflective Fresnel. When implicit conversion is not enough, you can use the Corona scene Converter to convert the scene to Corona Materials, which lets you adjust the Corona materials to give the expected results.
‘Sidewalk’ scene from Cinema 4D Studio Content Browser, by Fredi Voss.
Corona Camera
The Corona Camera works intuitively and just like a real camera. Below is a look at some of the features:
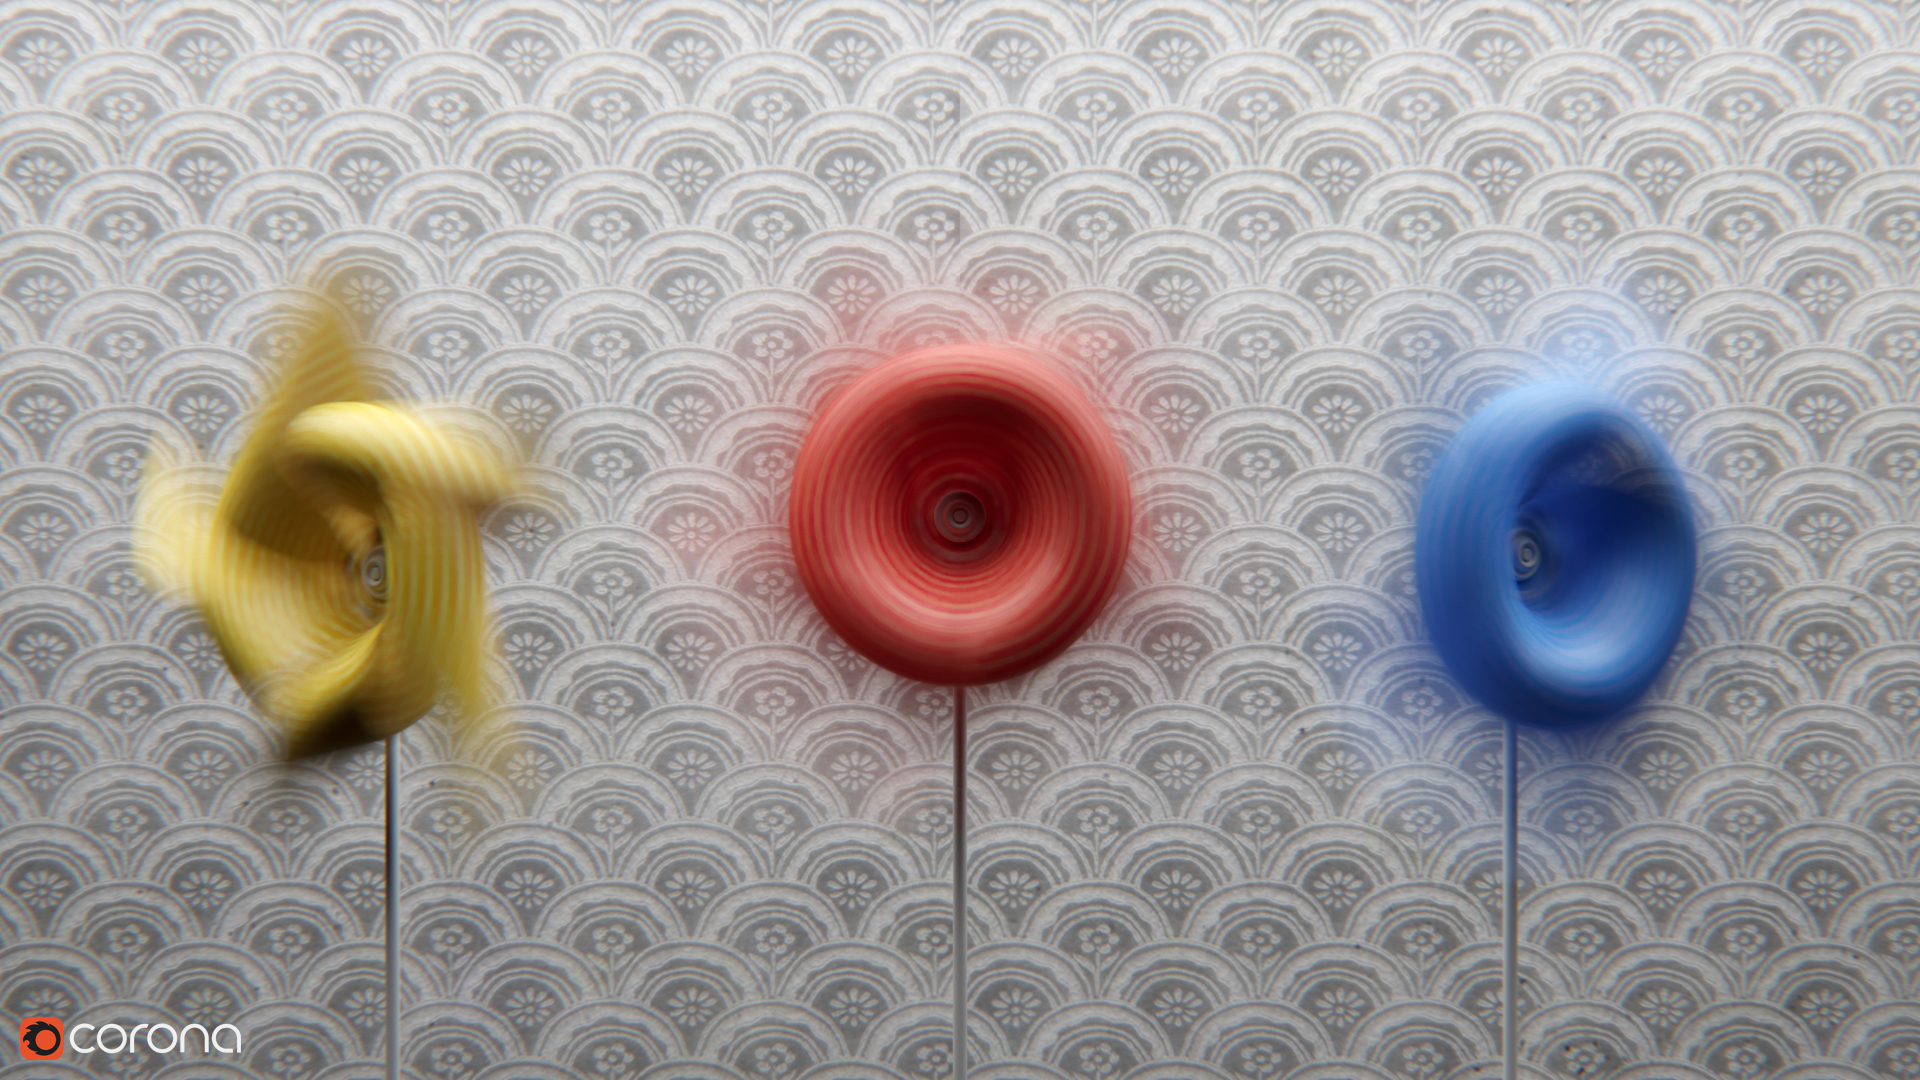
Motion Blur
Motion Blur is fully supported from the Corona Camera, with realistic controls and results.
Depth of Field
The Corona Camera’s depth of field offers advanced Bokeh controls for Center Bias, Vignetting and Anisotropy.

Positive values of Center Bias expand the bokeh into rings, while negative values compress the bokeh highlights.
Positive values of Vignetting give a harder edge to the Bokeh toward the outside of the image, while negative values create a harder edge to the Bokeh highlights toward the center of the image.
Anisotropy affects the aspect ratio of the bokeh effect, with values above 0 stretching it horizontally, and below 0 stretching it vertically.
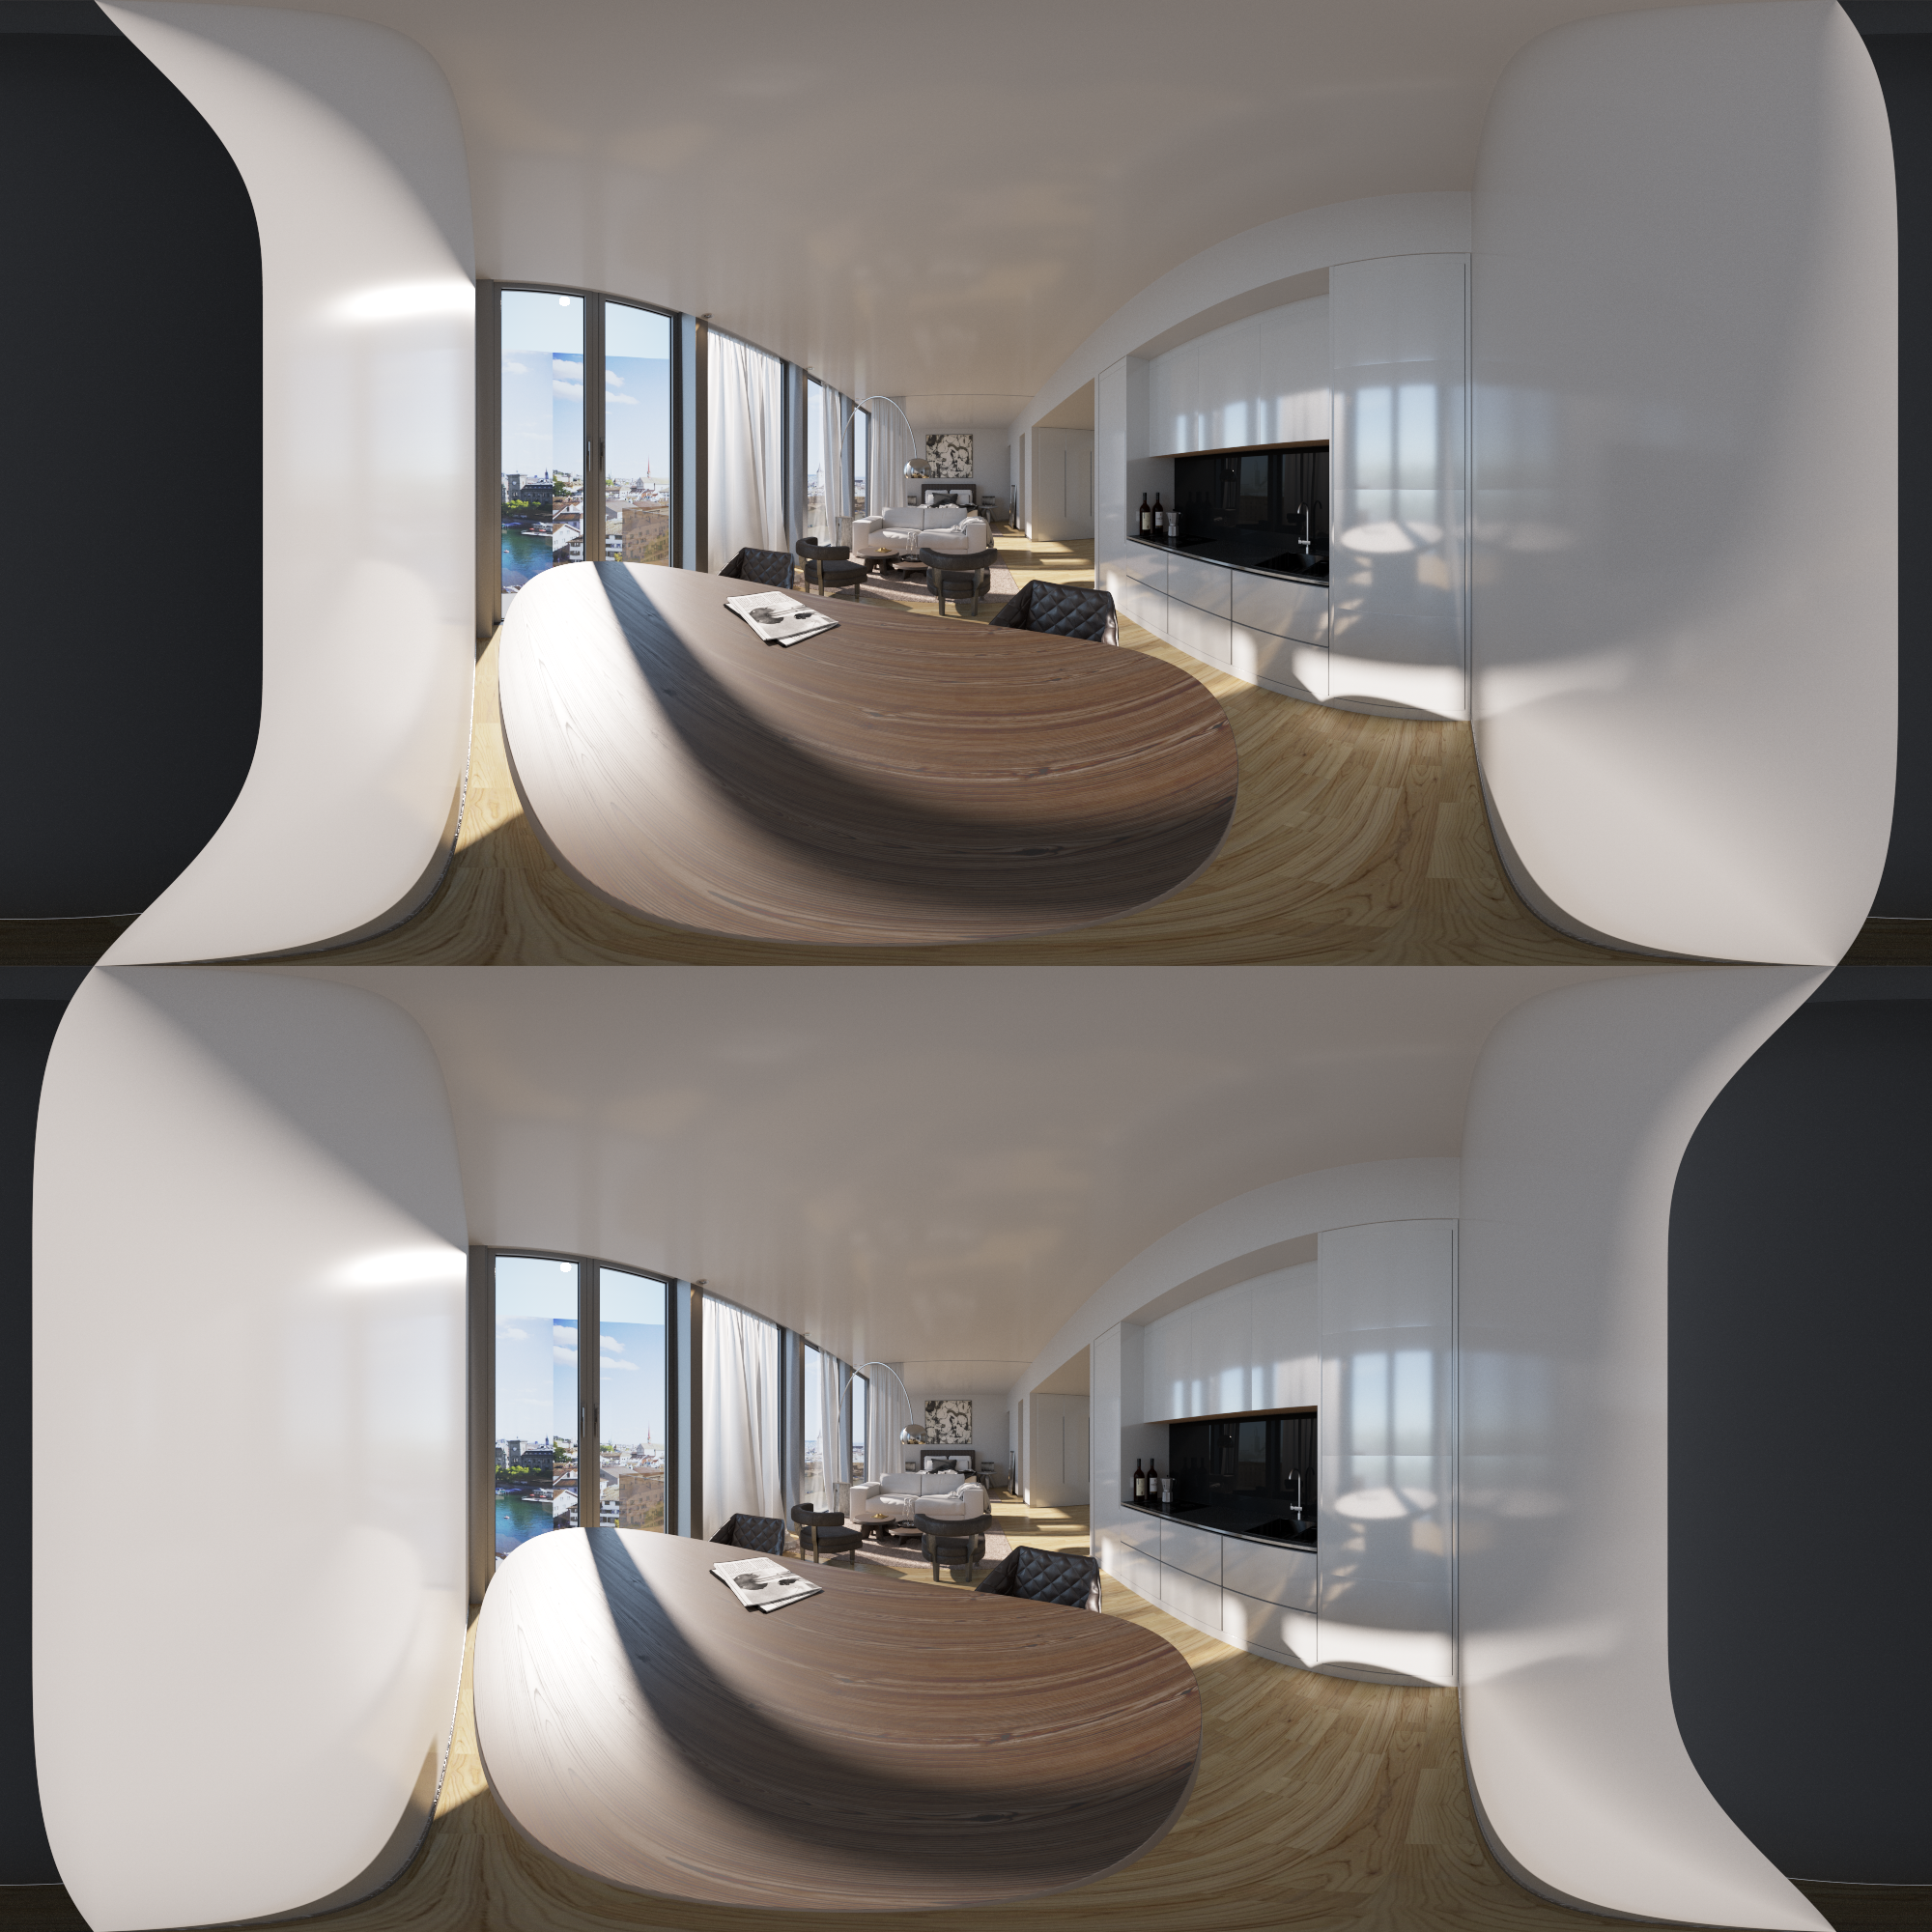
VR
The Corona Camera also has all the controls you need to render your panoramic images and VR content, with just the click of a few checkboxes.
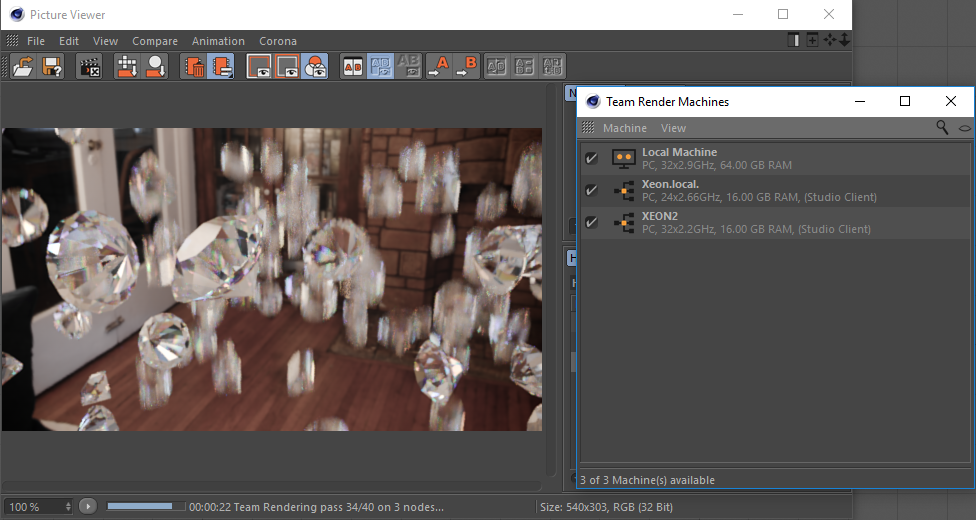
Team Render Support
Corona Renderer works with Team Render out of the box, making it easy to harness the power of all your available machines to contribute to a render (or to share frames of an animation across machines using the Team Render Server).
macOS
Corona Renderer for Cinema 4D is available for macOS as well as Windows, so whichever platform you run Cinema 4D on, you can have access to the power of Corona!
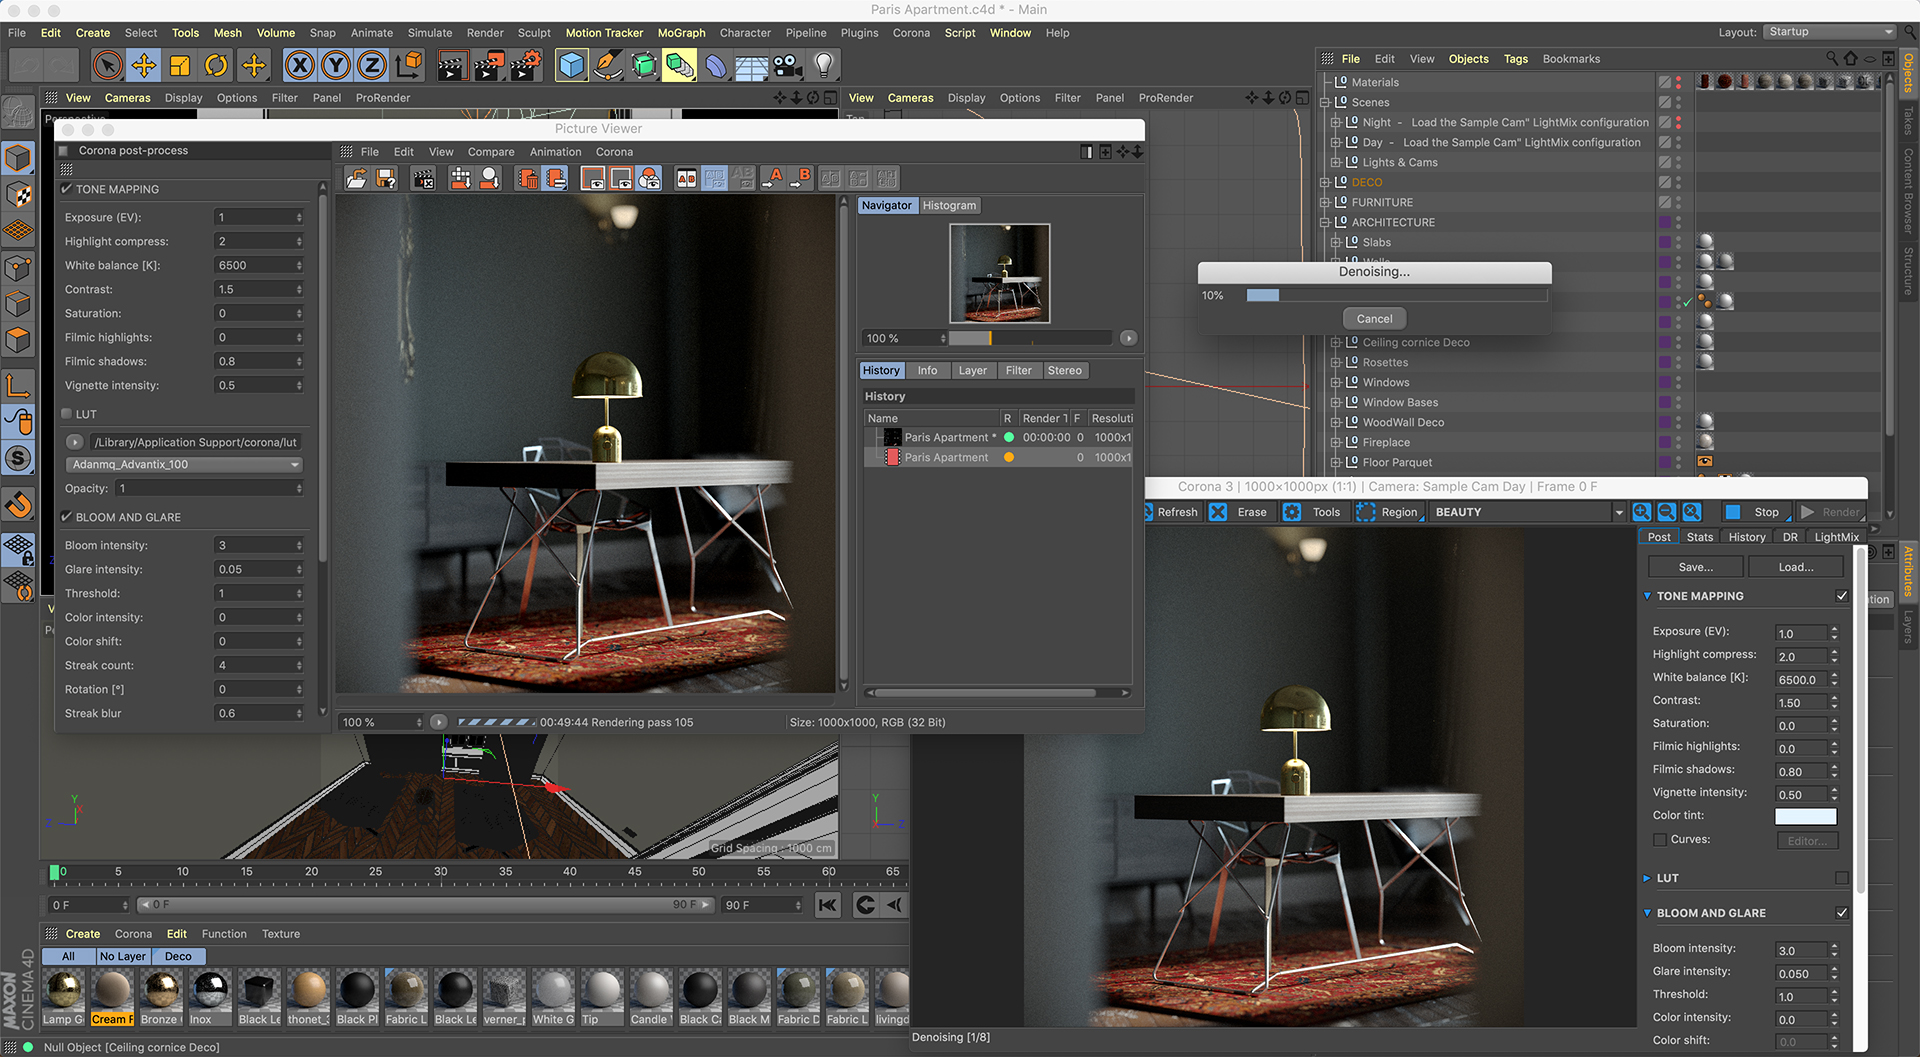
Post Processing
Corona Renderer aims to simplify the process of going from 3D scene to finished image, including reducing or even removing the need to turn to any 2D post-processing software. During or after rendering, you can adjust features such as exposure, white balance, color curves, contrast, saturation and more, all right in the Corona VFB or Cinema 4D Picture Viewer.
You can also apply LUTs to give the look of a particular camera or film stock to your image, apply bloom & glare, and blur and sharpen the image. Below, the same render is given three different looks by adjusting some of the post-processing settings:

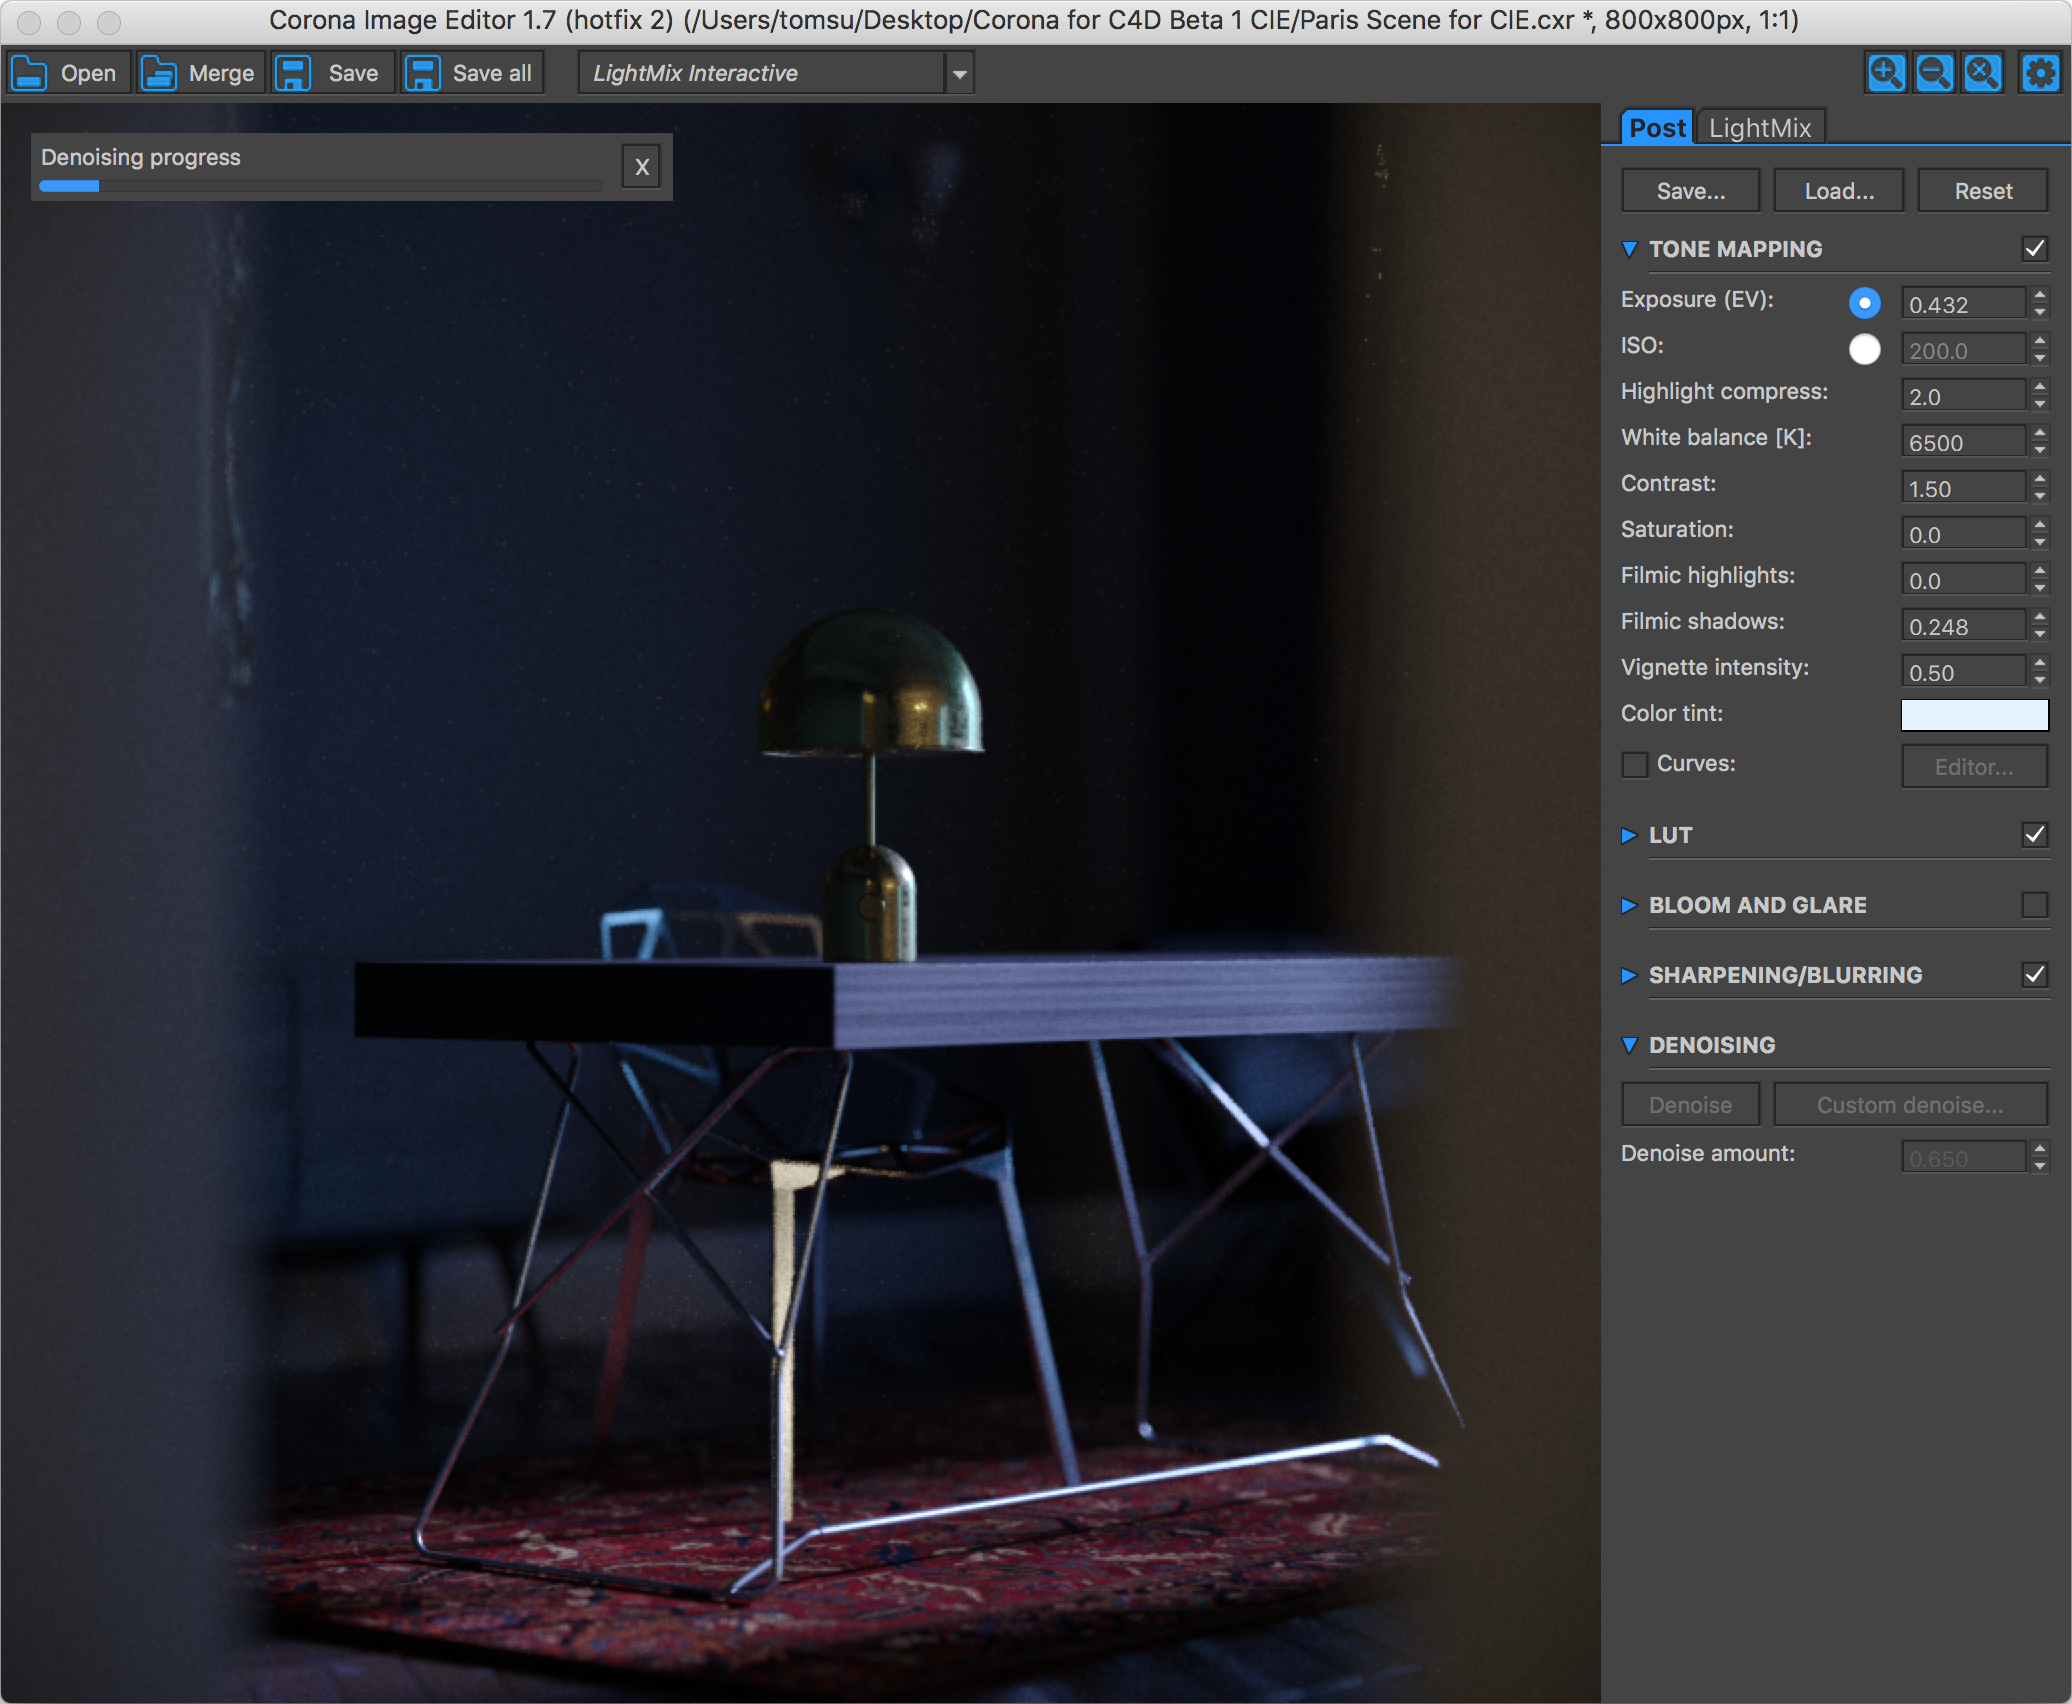
Corona Image Editor
The Corona Image Editor (or CIE as we like to call it) lets you apply LightMix, denoising, tone mapping, LUTs, bloom and glare, curves, blur / sharpen, vignette, etc. to images outside of Cinema 4D, using images saved in CXR format.
The CIE runs under Windows and macOS – the example screen grab below shows it being used to adjust a render from the free Paris Apartment scene from Slashcube (on macOS):
Post-processing set ups and LightMix set ups can be saved as .config files and freely exchanged in either direction between the VFB in Cinema 4D and the CIE.
Shadowcatcher
The Corona Shadow Catcher material allows you to seamlessly and realistically combine your 3D scene with an HDRI map or backplate image. This allows your objects to interact with the existing image by occluding lights and casting shadows as if they were in the scene when the image was captured.
Lining up your object or camera’s point of view is made simple thanks to the Interactive Renderer, too.

Render Selected
This allows you to render only the selected object from the viewport (unselected objects will not be shown in the rendered image); or users can specify what to render/not render in an include/exclude list. The feature works both in a final render, and in Interactive Rendering.
(Free scene from Studio Heisenberg and Yarko Kushta)
Resume Render
If you were forced to stop rendering before an image was complete, you can now save this “half-rendered” image and resume the rendering later. This feature works for the VFB and the Picture Viewer.
You can also use this feature to add additional passes on top of an already rendered image, if you later decide those would have been useful. You can choose to resume the last render if it is still loaded in the VFB, or simply save the render to Corona EXR (.CXR) format to be able to use this feature at a later time or date.

Multipass Rendering
If you want to work with your image or animation in post, Corona Renderer has a comprehensive range of Multipass Channels including Velocity, ID, ZDepth and many more. You can also use the “Render only masks” option to quickly render the Mutipass Channels without having to render a Beauty pass.

Corona Proxy
Proxies are useful for keeping smooth viewport performance while handling large amounts of high-poly objects in the scene, by letting you decide how the proxies will be represented in the real-time viewports in Cinema 4D. They also make your scene files smaller, as the proxy objects are stored separately (and can be re-used in other scenes).

Note that proxies do not improve render time or quality in any way.
Portals
Portals are geometry (usually planes) with the Corona Portal material applied that help direct Corona Renderer on where to focus its sampling so that an image cleans up faster. Corona Renderer does not care about the direction of the normals of the portal geometry.

DOWNLOAD LINK (again)
As you can see, Corona Renderer has an extensive set of features that set it apart from other render engines. Now that you are itching to download it and try it for yourself, here’s that download link again so you don’t need to scroll all the way back to the top!
https://corona-renderer.com/download/
RESOURCES
If you are brand new to Corona Renderer for Cinema 4D, you should check out our Resources section, in particular the Models section which features various free scenes using Corona Renderer for Cinema 4D, the Materials section that has some links to third party sites where you can grab free materials for Corona Renderer for Cinema 4D, and some Tutorials to get you started.
You will also find many useful articles over on our Helpdesk for Corona Renderer for Cinema 4D, which cover everything from first steps to any specific questions you may have. You can also check the full feature list to see everything that Corona Renderer for Cinema 4D has to offer.
And if you have any problems or questions, our Cinema 4D helpdesk is fully operational and our support team will be happy to help.
A note about free beta versions – all beta versions will expire 45 days from the day of the release.
WHAT’S NEXT
One thing about all of us here at Render Legion is that we never stay still – now that Corona Renderer 3 for Cinema 4D is out, we’ll be starting work straight away on integrating the changes happening with the Corona Renderer 4 core!
We’re also excited to announce that Cestmir will be taking on the role of Lead Developer for the Cinema 4D, while Nik will be shifting focus to other things. For those of you who have been using Corona Renderer for Cinema 4D during the Alpha and Beta stages, you’ll already be familiar with Cestmir from all his responses on the Corona Forums to your requests and bug reports 🙂
We also welcome your feedback and ideas for what you’d like to see in Corona Renderer for Cinema 4D as it develops, so please make good use of our Feature Requests board on the forums!
Thanks!
Nik, Ales, Cestmir, and the Corona Team!
GOOD LATE THE MARKET TODAY IS RENDERIZAR animations FOR THE GPU AND NO MORE FOR THE CPU … (OCTANA WINNING MARKET)
WHAT DO YOU HAVE FOR THE FUTURE?
GPU rendering is good for some things, CPU for others, and it’s never as cut and dried as some people would have you believe 🙂 https://corona-renderer.com/features/proudly-cpu-based and https://corona-renderer.com/features/the-cpu-advantage explain some of it. Sure there may be good GPU renderers out there, but that means people still need a great CPU renderer – and that’s where Corona Renderer comes in 🙂
Corona Developers,
Around 20 years ago I was using the grandfather of IPRs “FPrime” for Lightwave 3D. It had one very cool and useful feature: You could start rendering out a sequence and it would spend a few seconds on each frame of the sequence and then move on. Very quickly you had something you could import into After Effects and start to work with. It would then keep running through the sequence refining each frame. You could give it a quality setting to hit.
This was so useful because you didn’t have to wait around for frames to get started with your project. It did create a sequence of render buffer files that were pretty large but in today’s world that’s no big deal. You would just delete the temp files if you were good to go. I have not seen any of the other IPRs do this. It was and could be so helpful if something like this could be implemented.
Thank you!
Hi! For feature requests, please post over on the forums (https://corona-renderer.com/forum/index.php?board=38) – unfortunately, developers can’t monitor blog post replies, so the place to post for them to see and consider feature requests is over on the forum (means they just have one go-to place to check for requests 🙂 ). Thanks!
Hah, GPU based renders had an advantage when GPU’s were cheap. With bitcoin miners and Octane user market demands, GPU’s are far more expensive than a couple years ago. I’ve been using this beta and have been blown away. I’m easily keeping up output on my Macbook Corona to my colleagues $10k+ GPU Octane rig.
2019 will be a great year!
It already is 😉 But yes, it will just keep getting better!
Love Corona, just sucks it doesn’t have a permanent price. For that I would just use octane. Hopefully a one time payment for corona happens, that’s a good budget at that. Keep up the work, from my past renders before this update, everything looks crisp and nice.
Thank you
It looks like cinema 4d filter and selection filter option for light doesn’t work whith native corona light objects..
Please post any bugs or issues over on the forums, or let us know by sending in a support ticket – developers and support don’t monitor comments on the blog (which is also not a good place to share things like scenes, screen grabs etc. that can provide useful information). This page gives links to the ways to report issues and the information we need to be able to investigate – https://help.c4d.corona-renderer.com/support/solutions/articles/12000033461-how-to-report-issues- Thanks! Tom
I use mac.
I’d like to use radeon GPU.
When does it correspond?
Hi! The NVIDIA GPU denoiser does require an NVIDIA GPU. Since the denoiser is developed by NVIDIA, that unfortunately is something that is not going to change. However, the CPU Denoiser (recommended for final renders anyway) is still fully functional, whichever manufacturer of GPU you use! Thanks!
i used corona for c4d exclusively for years. right from the earliest alpha. unfortunately I’ll be dropping it now, as you’ve decided to go subscription only on release. Such a shame. that pricing policy just doesn’t suit me. I’d assumed that there would be a box version option like with 3d max. please reconsider this. I’d rather not take my money elsewhere!
Sorry to hear that the subscription approach does not suit you – unfortunately, there are no plans to change that. Developing the two different versions takes extra development time, and only a very very small number of 3ds Max customers go that route (it is entirely possible that a Box version for Max may be discontinued at some point as a result, too). One major difference with our subscription is that there are usually two updates per year, which are always major updates with useful new features, which is not always true with other subscriptions 🙂 If you change your mind, we will be glad to welcome you back!
Ruined my day – subscription are the worst.
Sorry you feel that way – however, there are no plans to change from the subscription approach.
I feel the same 🙁 I hate subscriptions.
Like we all do. This is a win-lose situation and people will drop corona if any competition will show up
Obviously not like “we all” since there are many satisfied Corona customers, both on Cinema 4D and on 3ds Max, who have no complaints about the subscription model. And competition showing up – there are already alternative render engines out there, and yet people still subscribe to Corona. While we are sorry subscription is not for you, it does perfectly suit the needs of the vast majority of our customers. Thanks!
Really fantabulous
So I can not use free Alfa version with Cinema 4d on Mac any more?
3ds Max free version still working?
Correct, the alphas and betas were only free while in development – with the commercial release being on Jan 7th, those have expired now. There is the 45 day free trial, and of course the purchased license. There will be an “always free” version for Cinema 4D at some point, but it will of course be very feature limited (just like the 3ds Max free version, which is a long, long, long way behind the commercial version!) Thanks!
Ok, so after all you have plans to release free version for Cinema 4d, do you have any estimate and will it work on Mac platform as well? Also what will be difference between this new free version and an old Alfa 6? Thanks!
We have no estimate at this point on when it will be available, or what feature set it will have (Alpha 6 was the 3ds Max free release, there isn’t a correlation between that and the Corona Renderer for Cinema 4D Alpha 6; the free version in the case of C4D will have to be created specially, so there will be a deliberate choice of what features to include and exclude, rather than just release a previous test version of the code). Our plan would be for that version to be available for Windows and Mac (one of the reasons that just using old test versions would not work, as earlier versions of Corona on Cinema 4D were Windows only). Thanks!
So I can not use free Alfa version for Cinema 4d on Mac any more?
Correct, the alphas and betas were only free while in development – with the commercial release being on Jan 7th, those have expired now. There is the 45 day free trial, and of course the purchased license. Thanks!
If there is a possibility, work on the motion blur while moving the realflow plug-in.
Hi! Always best to post feature requests, bugs, and feedback over on the forums – developers can’t track comments here on the blog unfortunately, but the forums are monitored and used to track tasks and requests 🙂 https://corona-renderer.com/forum/index.php?board=38.0 for the feature requests board, for example. Thanks! Tom
hi sir/mam,
we have recently launched a free 3d modeling website for people,you can get every model free with fresh wireframe,
https://www.create3dmfree.com
Hi all,
I want to buy this software, Iam from Indonesia…
May you help me, where i can buy Corona Renderer For Cinema 4D – FairSaaS – 1 WS + 3 Nodes ?
Let me know by email to alil.chandra270@gmail.com
Hi! If you cannot buy direct from our store (https://corona-renderer.com/prices-licensing), you can find a list of resellers at https://corona-renderer.com/prices-licensing/resellers (which is linked at the bottom of the regular purchase page). If you continue to have any additional problems, you can always contact us at support@corona-renderer.com. Thanks!
Dear Sir,
Thanks For Shearing Such Information, I Want to Need Information For This Software.
Hello,
This video is old, please see the latest release information (we are onto Corona Renderer 5 for Cinema 4D now see https://blog.corona-renderer.com/corona-renderer-5-for-cinema-4d-released/, with Corona Renderer 6 in development). If you need additional information about the software, please contact support, see our Contact Us page at https://corona-renderer.com/about/contact